Advertising disclosure
Hosting Canada is community-supported. We may earn a commission when you make a purchase through one of our links. Read Disclosure.
How to Customize WordPress
 Back in the bad old days, you needed to know HTML to design a website. As the web got more advanced and complex, you needed to learn Javascript as well.
One way to avoid this is to use a content management system (CMS). A CMS, like WordPress or Wix, does the heavy lifting for you. Through the use of themes, a WYSIWYG editor, and prebuilt widgets, you can build a professional-looking website without writing a single line of code.
WordPress is, by far, the most popular CMS in the world. As of March, 2020, it’s used by over 35 percent of websites. But why is it so popular?
The answer is that WordPress has struck a perfect balance between customization and ease of use. You can use a default theme and put together a quick and dirty blog site. Or you can install plugins and build a truly professional website.
Here, we’ll discuss everything you need to know about customizing your WordPress site. We’ll talk about basic settings, themes, and widgets. We’ll also talk about more advanced features like plugins, analytics, and other integrated tools.
Note: If you are able to handle the design and customization yourself, you’ll greatly reduce your website development costs.
Let’s take a closer look!
Customizing WordPress 101
There are several ways in which you can customize your WordPress site. Perhaps the most important thing to note is that WordPress is not a hosting company. It’s just a CMS. As a result, you’ll need to choose your own host and register your own domain name. Many hosts offer quality dedicated WordPress hosting, with WordPress pre-installed on your server.
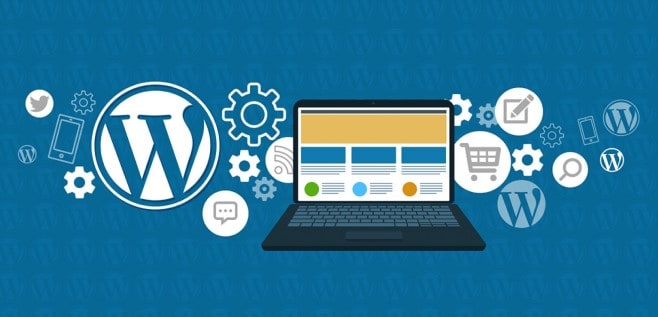
Once you’ve sorted out your hosting situation, the next step is to build your site. There are two primary ways to customize a WordPress site:
- ☑️ Choosing a theme
☑️ Adding widgets
☑️ Adding a menu
We’ll talk about all three of those options later in more depth, but here’s the gist of it:
Themes define the layout and color scheme of your site. You can build a basic blog format, an image gallery, and other common page types. You can even choose a different theme for your home page, to give your site a more bespoke look.
Widgets are tools, typically located in the sidebar, that provide added value. Typical widgets include social media links or an email signup form.
Menus make it easy for visitors to navigate your site. For example, suppose you run an auto repair shop. You might have a menu at the top of the page with links to parts, services, a Google map of your location, and a “contact us” page.
In addition to these options, there are other, more advanced ways to customize your site. One of these is to create a cascading style sheet (CSS). CSS allows you to customize fonts, colors, and font sizes for different styles of text.
So instead of manually setting font sizes and colors for each page, you can create preset options for headers, subheaders, and plain text, and select them quickly and easily.
You can even create custom headers for your WordPress site. A custom header will tie your entire site together. Each page will look like part of a greater whole, even if the theme is otherwise different.
Can You Fully Customize WordPress?
When you think of WordPress, you probably think of a blog or other content-oriented site. Indeed, it’s used by companies as prestigious as Flickr, LinkedIn and BBC America. But suppose you want to integrate more advanced features such as forums, customer chat bots, or ecommerce? WordPress does not natively support any of those applications.
Thankfully, there are literally thousands of plugins that add functionality to your site. This rich ecosystem includes just about any web feature you can imagine. So if you want to add a forum or ecommerce page to your site, it’s certainly possible to do.
The only problem is that these plugins don’t scale well. They’re designed for small to medium-sized sites, and larger sites will need to use more and more convoluted kludges to maintain performance. In that case, you might want to consider a more advanced CMS with more native features.
Then again, if your site has gotten so big that you’ve outgrown WordPress, that’s a good problem to have.
WordPress General Settings
 Before you start building your site, WordPress will ask you to configure your basic settings, such as your username, password, and other basic server settings.
This is a good time to make sure your WordPress site is secure, since getting your basic settings wrong can leave you vulnerable to hackers.
Before you even log in, WordPress will ask you to create a username and password.
Make sure to use a strong password. And never, ever use “admin” as your username. That’s the first thing hackers will try to guess, since many creators never change it.
Once you’ve logged in, you’ll see the dashboard, which is where you’ll be doing the bulk of your work. At first, the dashboard is a bit cluttered. There are several widgets on the screen, but not all of them are necessary for all users.
There’s a small link in the top right corner of the screen that says “Screen Settings”. Click that, and you can disable individual widgets. The “Welcome”, “Quick Draft”, and “WordPress Events and News” widgets should be the first to go. Most people will never use those features.
Next, click the “Settings” link on the left side of the page, and click the link for “General Settings”.
There, you’ll see your most basic site options. The first two boxes allow you to enter a title and tagline for your site. The site title will appear on browser tabs, while the title and tagline will appear at the top of the page in many WordPress themes. Since these are the first things many people will see when they visit your site, it’s a good idea to put some thought into them.
Next, you’ll need to enter your WordPress Address. This should be the domain you’ve registered for your site. WordPress will automatically look in the WordPress directory to find your homepage. If your homepage is different – for example, if it’s hosted on another server – enter that URL in the “Site Address” box.
However, for most sites, the WordPress Address and Site Address should be the same.
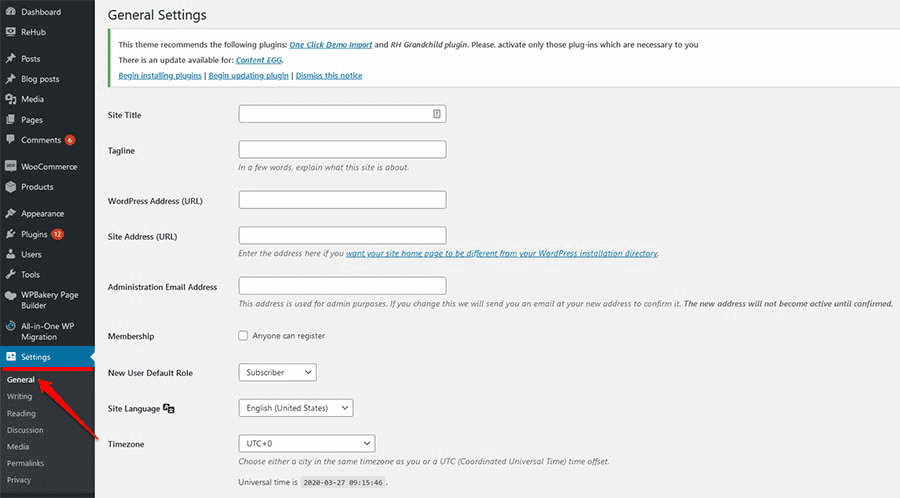
You can also change your administration email address. By default, it will be the admin address for your website. If you have another email account like Gmail, you can enter that information here.

For most people, this is a good idea, since hackers will have a harder time guessing that information. In the worst case scenario, having an admin email address that isn’t on your WordPress server will make it easy to reset your WordPress admin password.
At the bottom of the page, you can select your time zone, date format, time format, and site language. These are mostly administrative options, and won’t affect the user experience.
A Variety of Different User Roles
There’s one more option we should talk about: the new user default role. Here’s a quick rundown on what they mean:
- Super Admin gives a user to all administrative features on the site, as well as any other sites on the same network. Unless you’re running a network, this setting serves no purpose.
- Admin gives a user all the administrative options you have. For most sites, you’ll want to be the only admin. But if you’re running a website with a trusted partner, you’ll want to make them an admin.
- The Editor role allows a user to publish and edit any post on the website. This can be useful if you’re working on a collaborative project with other partners. Essentially, they can edit the site’s content, but not the overall format or security features.
- Author allows a user to publish and edit any posts that they’ve created. However, they won’t be able to edit content that was created by other users.
- A Contributor can write posts. However, they cannot publish them. Anything they’ve written will need to be published by an editor or admin.
- A Subscriber can only manage their own profile.
In general, you’ll want to leave the default user role set to “Subscriber”. Once someone has an account on your server, you can always use your administrative powers to change their role. If you have more than a handful of users, the easiest way to manage them is to use a third-party tool like phpMyAdmin.
If you decide to change any of these settings later on, it’s easy to do. Simply navigate to the General Settings page, and make any changes you need.
Customizing WordPress Themes
Now that you’ve configured your basic settings, it’s time to customize the look and feel of your website. The first step in this process is choosing a WordPress theme. There are two types of themes: free themes and premium themes. To begin with, let’s look at how to install a free theme.
From your dashboard, click the “Appearance” link on the left-hand side, then click the “Themes” button. There, you’ll see a tiled display of all the themes that are currently stored on your server.
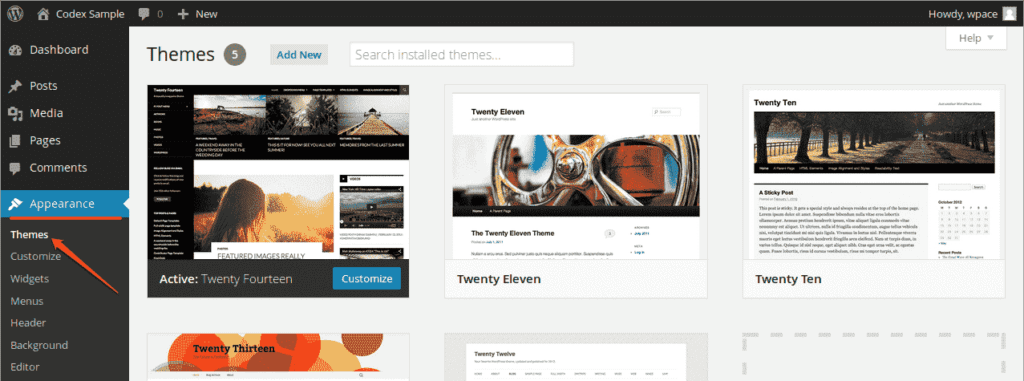
If you’re hosting on a dedicated WordPress server, there will already be several options. If you aren’t, or if you want to choose a different look, you’ll need to install a new theme.
Free Theme Might Not Be the Safest Option
There are several WordPress theme repositories on the web. But as the saying goes, “if it seems too good to be true, it probably is”. Many of these “free” themes are embedded with ad trackers or even malware that can compromise your site’s security.
To stay safe, the best place to find a theme is to choose one from the official WordPress repository. From there, you can search themes to find one that fits your needs. Choose a playful theme for your gardening blog, or a more buttoned-down theme for your professional blog.
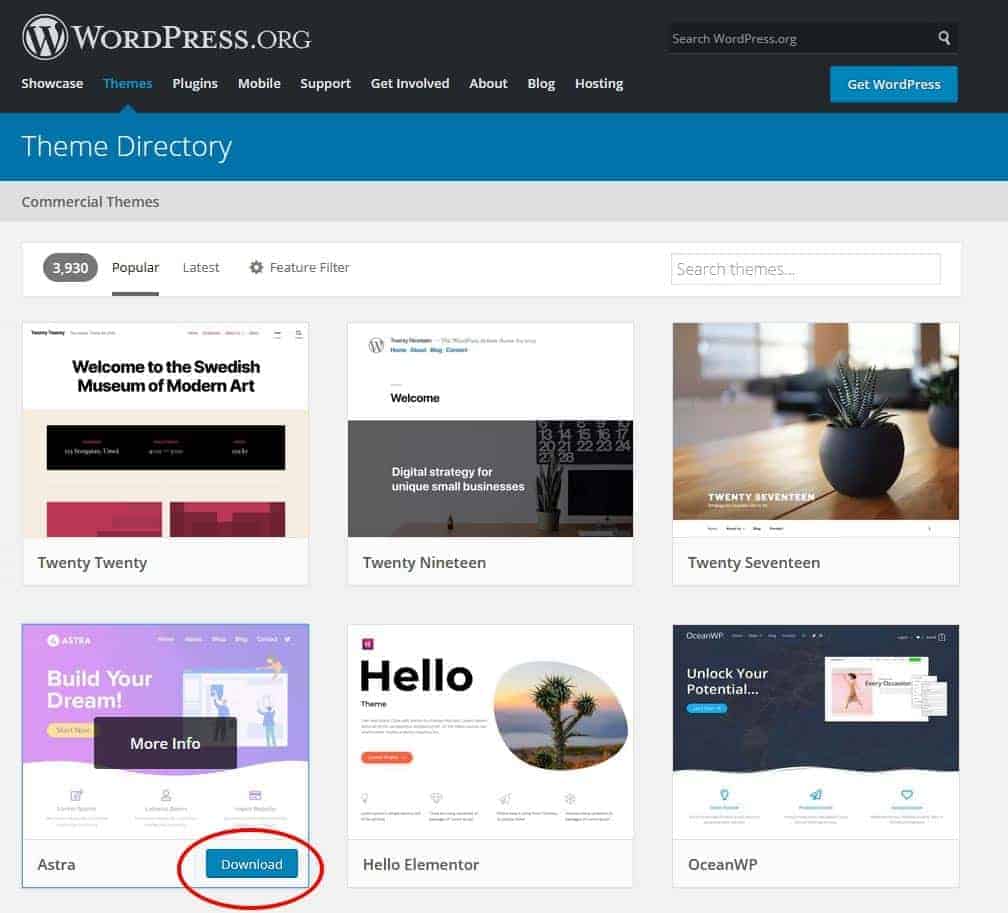
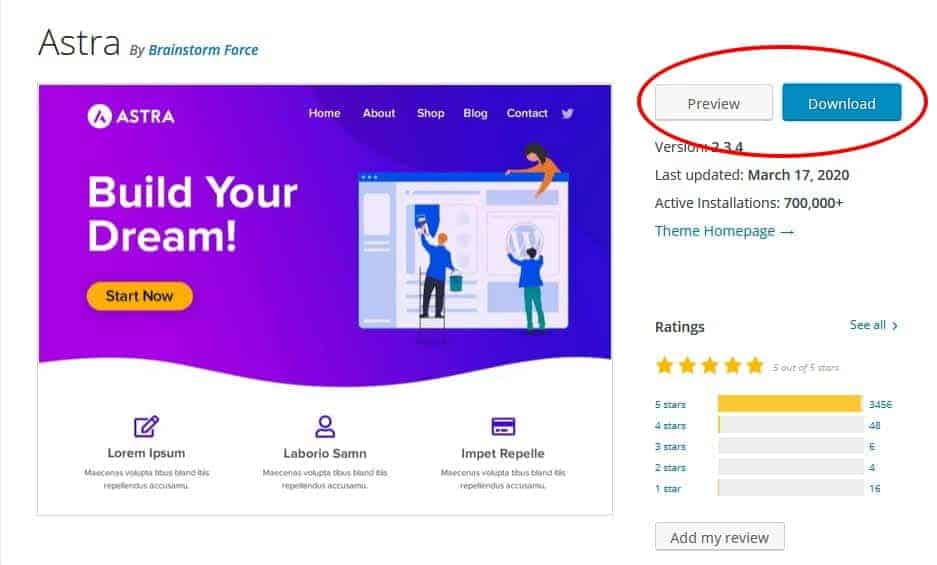
Once you find one you like, simply hit the “Download” button. It will save to your computer as a .zip file. From there, go back to your WordPress dashboard’s themes page and hit the button at the top that says “Add New”. Choose the .zip file of your theme, and it will upload to your server.
Select your theme, and you’ll have a couple of options. First, you can click “Details & Preview”, which will give you a live look at the theme in action, with some filler text and images. This lets you get a better idea of how it looks, without publishing it to the web. If you’re happy, just click “Activate”, and the theme will go live.
WordPress has a theme editor that allows you to manually edit your theme. Even if you’re comfortable with HTML, PHP, and CSS, don’t use it. WordPress even warns you not to. The reason is that you can permanently break your site, so you’ll need to reinstall the theme and start from scratch. Furthermore, any changes will be lost with future theme updates.
If you want to tweak your theme, consider installing a plugin for theme editing. For example, Elementor is an excellent, safe WYSIWYG editor that won’t break your site. There are also other third-party options available, such as Gutenberg.
If you really want to edit the theme manually, you’ll want to create a child theme. This will ensure that your theme won’t get broken by future updates. The downside is that it won’t update at all. If the theme has a security issue that later gets patched outs, you’ll miss out on the fix.
Another important consideration is that most web users now access the internet via their smartphones. To provide a clean, comfortable experience for these people, you’ll want to choose a theme with responsive design. Before you go any further, just create a dummy page and run it through Google’s mobile-friendly test.
WordPress Premium Themes
In addition to free themes, there are several companies that sell premium themes. In addition to giving you a wider variety of options, premium themes have several advantages. These include:
- ☑️ More frequent developer updates which give you better security
☑️ Compatibility with the latest WordPress, HTML, PHP, and CSS standards
☑️ Customer support from WordPress to deal with bugs and customization
Once you’ve downloaded a premium theme, simply install it the same way you would install a free theme. Whether or not this is worth the expense is up to you.
WordPress Plugin Setup
 If you want to go beyond WordPress’ basic functionality, you’ll need to take advantage of plugins. Plugins are additional tools that can be used to improve your site’s security, create automatic backups, and even boost your site’s performance.
The disadvantage of plugins is that you give them access to your site’s data. As a result, a faulty plugin can compromise your site’s security.
Before you install a plugin, make sure to read reviews on a third-party site to make sure it doesn’t have any known security flaws.
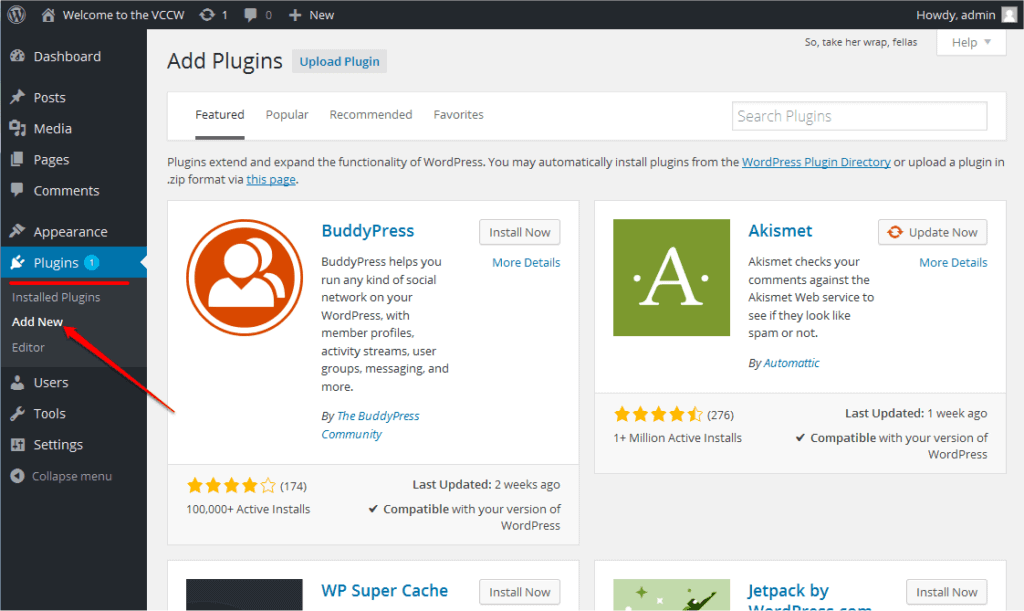
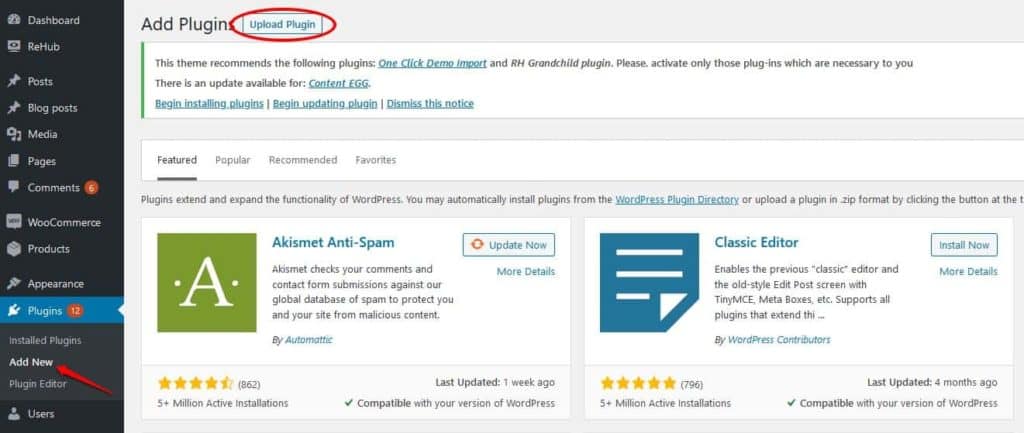
The best way to find a secure plugin is to use the official WordPress repository. Much like installing a theme, to install a plugin, you’ll first need to download it. A plugin will download as a .zip file, which you’ll need to unzip before you can upload it.
Once you’ve done that, open up your WordPress dashboard, select the “Plugins” menu, and click “Add New”. At the top of the screen, you’ll see a button that says “Upload Plugin”. Select that button, upload your plugin, and you’re ready to configure it.
When the plugin has been successfully installed, you’ll see a prompt to configure it. Most WordPress plugins are pre-configured, but it’s still a good idea to check out the options. Since options differ wildly between different plugins, you’ll need to consult with your plugin’s support page if you want more information on different settings.
It’s hard to give a comprehensive guide to which plugins you need, since the exact type will depend on the type of site you’re running. That said, there are a few that you should install right off the bat.
- Yoast is designed to help you boost your website’s ranking in search engines. It features a variety of built-in tools to help you create search engine-friendly content, including choosing the right keywords for links. The premium version even provides tips on extra keywords to include in your text.
- Akismet is a must-have if your site allows comments. It’s an anti-spam filter that eliminates known spam links to keep your comment section clean.
- Duplicator makes it easy to create backups for your WordPress site. Run a backup before you make any major changes. If your changes cause the site to crash, just restore the backup and you’ll be back online. Duplicator can also be used to easily migrate your site from one host to another.
WordPress Premium Plugins
As with themes, not all WordPress plugins are free. Sometimes, you have to pay for a premium plugin. This can either be a one-time cost or a monthly subscription. The upside of this is that you get better support, which is especially important for security-related plugins.
If you’re going to install one premium plugin, install Defender Security. This plugin enables 2-factor authentication for admins, as well as a slew of other security features. It’s free for the first 30 days, and costs a monthly fee from that point onward.
Another good premium plugin is Hummingbird. It helps you optimize your site to make it load as quickly as possible. It also improves the efficiency of browser caching. Like Defender Security, Hummingbird comes with a free 30-day trial.
Regardless of which premium plugins you buy, you can install them exactly as you would any free plugin.
How to Add Unique Content to WordPress
At this point, you’ve created your site’s basic settings, built your theme, and chosen plugins for efficiency, security, and SEO. But you know what you haven’t done yet? Actually created any content. Let’s fix that.
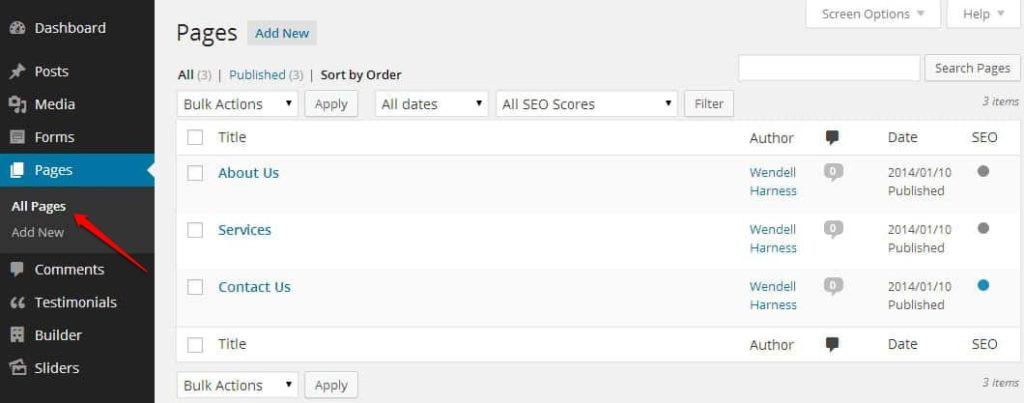
To create a new web page, go to your WordPress dashboard, and select the “Pages” menu. There, you’ll see two options: “All Pages”, and “Add New”. By default, WordPress will create a privacy policy page, as well as a sample page you can use as a sandbox to fool around in. These will be visible in the All Pages menu.
To create a new page, just click the Add New button.
At that point, you’ll see a blank page in your chosen theme. Depending on your theme, you’ll be able to enter a title, or your page title and tagline may be prefilled. Underneath, you’ll be able to enter your text or place pictures.
If you’ve installed Yoast – and you really should – you’ll see a box at the bottom of the window to enter your focus keyphrase. Type your keyphrase into the box, and Yoast will automatically help you optimize your page as you write.
For most websites, you’re going to want a few pages at a bare minimum: your homepage, your “about” page, and a “contact” page.
Again, this is a bare minimum. In practice, you’re going to want additional pages that are tailored to your site’s purpose.
For instance, if you’re running a hair salon, you might want a gallery section that shows off your latest results. You might even be able to turn this into a promotion for regular customers. “Let me feature you on my website, and get a free haircut” can go a long way.
To use another example, if you’re running an automotive shop, you might want a “services” page with prices for common services.
Update Your Blog Regularly
And, obviously, if you’re running a blog, you’re going to want posts. In this case, make sure to update regularly. There’s no better way to lose followers than to stop blogging for a month and a half.
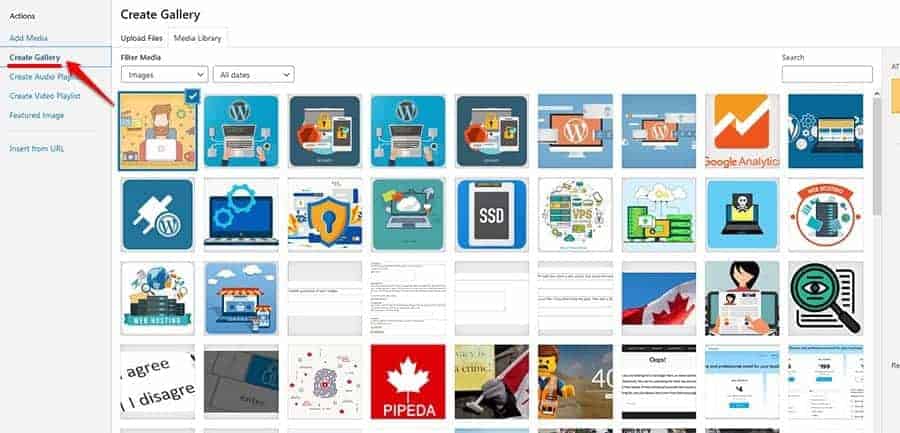
Depending on what type of content you’re posting, you might want to use a different layout. For example, if you’re posting a lot of pictures, you might want to add a photo gallery. On the other hand, if you’re just blogging, simple text with an attractive banner will work just fine.
Speaking of a banner, right now is probably a good time to add a site logo, if you haven’t already. To do this, simply navigate to your theme’s “Header” menu, and click “Select Logo” to upload.
Ideally, the logo should be in PNG or WebP format, which will allow the background to show through any gaps. Keep in mind, though, that your logo will replace the site title in most themes.
On a similar note, you should choose a site icon. This is the small image that appears on a browser tab, making it easy to distinguish from other tabs. Just as with a logo, a PNG or WebP format is ideal, unless your icon is a perfect square. You can choose your site icon the same way as your logo, from your theme’s “Site Identity” menu.
How to Use WordPress Widgets
Widgets allow you to expand your site’s functionality. For example, you can add a calendar, social media links, or an email signup. In most themes, widgets will appear in your site’s sidebar, although some themes will place widgets at the bottom of the page instead.
To configure your widgets, back out of your Theme menu and click on the Appearance menu instead. From there, select “Widgets”. Depending on your theme, you’ll see a variety of potential widget locations. There may also be some widgets pre-installed as part of your theme.
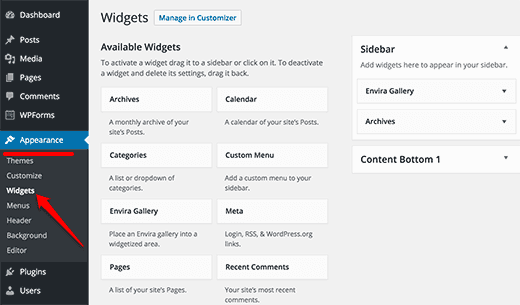
You can simply drag and drop widgets to different locations to move them around on the page, further customizing the look and feel of your site.
If you don’t like a widget that’s already installed, simply click the arrow on the widget name and click “Delete”. This will remove it entirely from your page.
Alternatively, you might want to add additional widgets to enhance your website.
To do this, simply select them from the left side of the widget menu and drag them into the desired area of your page.
Unlike themes and plugins, you can’t add widgets directly to your page. That said, WordPress comes with several default widgets, and most themes include additional widgets as well.
Alternatively, you can add widgets via a plugin. To do this, find a plugin that features the widget you want, then add it the same way you would add any other plugin. Once the plugin is installed, return to the Widgets menu and the widget should be available.
Choose Widgets Depending on Your Website
Depending on the type of site you’re building, you’re going to want to use different widgets. That said, there are several types that should be useful for just about any website. Here’s a quick rundown:
- Social media links – for most websites, these are a no-brainer. Getting people to share your content on Facebook, Twitter, and other social media sites is a great way to boost your visibility.
- A “Recent Posts” widget – Not all sites will use one of these. But it’s a great feature for blogs. If someone found your post via a Google search, why not give them an easy way to stick around and read more?
- An email signup widget – If people like your content, it’s a good idea to encourage them to get updates. A plugin like WPForms makes it easy to collect email addresses and other information.
- A calendar widget – This is a great option for community organizations. You can use this widget to let people find out about upcoming special events or fundraisers.
- An ad widget – Be careful with these. On the one hand, advertising can help you earn money from your website. On the other hand, more than one ad can make your site look cluttered, and turn people off.
How to Edit WordPress Menus
Now that you’ve got some content, it’s time to make your site easy to navigate. To do this, you’re going to want to add a menu. Go to the “Appearance” section of your dashboard, and click the “Menus” link.
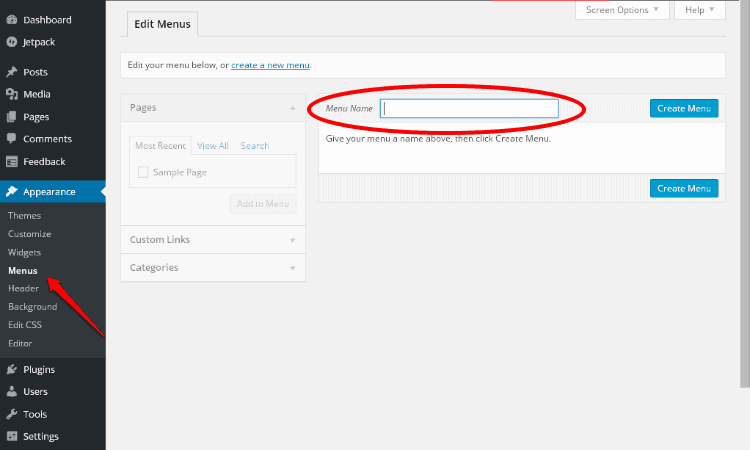
Don’t worry about the menu name. You’re the only one who’s going to see it. That said, if your site is going to feature more than one menu, you might want different names to distinguish them. For most sites, this is a bad idea – more than one menu just clutters the page.
Click “Create Menu”, and the next screen will ask you where the menu should be placed. For most websites, this will be at the top of the page, but there are exceptions. The “Mobile” option lets you customize menu location on a mobile device. For example, you may have a sidebar menu on your desktop site, but still want a top menu for easier mobile use.
Don’t worry about the check box that says “Automatically add new top-level pages to this menu”. This option leads to messy, sloppy menus with the pages out of order. You’ll want to manually add pages as they’re created.
On the next screen, you’ll be able to add pages to your menu. Once you click “Add to Menu”, you’ll see another screen that lets you customize the menu order. Arrange the pages as you see fit.
You can also expand individual menu options, and insert additional pages as sub-options. For example, if your doggy day care offers grooming and walking services, you can put both of those pages under the main “Services” menu. This will help you keep a clean look, and avoid cluttering up your site’s main menu.
It’s also important not to rely on your menu alone for navigation. Interlinking different website pages can make it easier for users to navigate. It can also help boost traffic, along with your search ranking.
WordPress Integrations
Congratulations! You’ve built your website!
But you’re not done yet. Now you need to integrate some analytics tools to understand your traffic. This has a couple of benefits.
First, it allows you to understand how people are finding your site and how long they’re staying.
Second, it gives you insight into what type of content is driving your traffic. Blogs? Photo galleries? Informational pages? This can help you further develop your site to improve web traffic.
Analytics
 The most popular WordPress analytics tool is Google Analytics, and it’s easy to understand why. Google is by far the most popular search engine on the web, so you want to understand your site’s Google search performance before you work on anything else.
But Google Analytics has a lot more to offer. They can tell you how visitors are getting to your site. Are they finding it on google? On other websites such as Facebook? Or are they visiting it directly? Knowing this information will let you know how you’re driving traffic, as well as what you can do better.
More Tools & Examples
Google Analytics doesn’t tell you everything you might want to know. For example, you might want to know the age and gender breakdown of your visitors. In that case, consider a more advanced tool like ExactMetrics. ExactMetrics isn’t cheap, but it gives you even deeper insight into your visitors than Google Analytics.
You might also want to automate some of your site’s functions. Zapier Automation does just that. With this plugin, you can automatically share new posts on social media. This can eliminate some of the hassle that comes with manually posting each daily blog post on multiple social media sites.


