Advertising disclosure
Hosting Canada is community-supported. We may earn a commission when you make a purchase through one of our links. Read Disclosure.
How To Manage WordPress Databases with phpMyAdmin (Pictures Guide)


Most people think of WordPress as a simple website and eCommerce store builder. Truthfully, anyone can use WordPress to build a variety of themed websites and online stores. However, you may not realize when you click that one-button install, you are actually creating a database.
Your MySQL database stores your website, and with proper care and maintenance, you never have to worry about losing your website.
With PMA, you can use tools for backing up and securing this database. We take a closer look at what a WordPress MySQL database does and how to protect your website with tools and a guide for PMA common tasks.
How To Use phpMyAdmin
Before getting in the details of WordPress databases, it helps to define a few terms:
What is a WordPress MySQL Database?
MySQL stands for “structured query language.” This defines the open-source database management system that you can actually run using queries.
Your WordPress has a MySQL database installed whenever you create a new installation. The database is one of two crucial components to your WordPress site. If WordPress is thee gateway and interface to building a website, your MySQL database is the heart. All of your content including posts, comments, pages, images, and so forth are stored in the database.
With every installation, new standard tables are created for your WP database. There are 11 total tables. However, if you have plugins necessary for your theme, you will have more tables. However, the installation files come with the core WordPress tables as follows:
- ☑️ wp_comments: all of your site’s comments are stored here.
☑️ wp_commentmeta: this includes the “meta data” (such as title, keywords, etc) for your comments on the site.
☑️ wp_links: holds information that you’ve entered into the WordPress link feature.
☑️ wp_posts: this includes all data for pages, navigation, and posts.
☑️ wp_options: this includes all of your administration and settings files.
☑️ wp_postmeta: meta data for all of your posts.
☑️ wp_terms: categories and tags are stored here.
☑️ wp_term_relationships: all information related to posts and taxonomies goes here.
☑️ wp_users: you can set up a variety of users such as admins and authors, and their information is stored here.
☑️ wp_usermeta: this is the user meta data.
☑️ wp_term_taxonomy: this includes the taxonomies for tables within wp-_terms.
These tables basically store all of the raw data and files that your website is built upon. On the WordPress side, you can style, edit, and upload media. These tables are created automatically when you install the WordPress installation files, so you don’t need to worry about configuring this part.
What is phpMyAdmin, and Why Use it for WordPress Database Management?
So why do you use this to control your MySQL database? With PMA, you can backup and control your database through tools, which means you don’t have to write out the MySQL queries.
Here are the main features:
- ☑️ Use tools to administer and monitor your databases with an open-source web application based in PHP.
☑️ Compatible with multiple servers in both Windows or Linux-based systems.
☑️ Modify any value point within your database.
☑️ Seamlessly click and run actions to perform SQL queries that control and secure your databases more effectively.
☑️ Create and remove any database you want.
☑️ Backup, export, and import databases in just a few mouse clicks.
Today, nearly all WordPress hosts provide this PHP administrative package within cPanel software, and all cPanel hosting providers do as well. You receive these as part of your hosting package, and they can be accessed through your hosting account’s product or settings pages.
However, if you are running your own server, then you would set up these files on your own.
Even if you have no knowledge of server setup and have just begun to learn about databases, you can use this as an administrative tool for your MySQL database. While there are many other administrative tools like this, PMA also works for other web development platforms like WampServer or MAMP.
As such, PMA is highly recommended for WordPress because it’s easy to set up, simple to use, and it’s included with most high-quality web hosting providers.
Do Your Need to Know PHP to Work With PMA?
The short answer is no! This PMA is written in PHP, which allows you to run within your normal web browser. All of the management actions already exist within an interface, so you can easily click and run to perform each one.
Want to learn PHP anyway? While you do not need to know how to write PHP in order to use PMA, you may want to learn PHP to better understand and customize your WordPress at a later date. Here’s a great beginner tutorial to get started.
How Do You Access PMA?
If this is your first time learning about MySQL and PMA for database management, then you probably want to use a hosting provider’s tools to set up and manage your WordPress server.
Every website needs hosting, right? When you sign up with a hosting provider, whether you purchase a WordPress theme or use cPanel (or Plesk) to install the files, you’ll create a MySQL database.
You should be able to access PMA administrative home page within cPanel, or you may need to click on the hosting product under your hosting account, then click “Manage” or “Settings.”
If you have trouble gaining access to your databases management tools, you should reach out to your hosting provider or check out their support page.
Are you an advanced user setting up your own server and databases? If you are installing it on your own, there are several ways to add it to your server. For those who need VPS hosting with full server control, you can use installation guides to get setup information for every type of server.
Using phpMyAdmin to Manage Your WordPress Database
As you may have inferred above, there are essentially two ways to set up this PMA f WP database management.
The most common and easiest way to access PMA is through your hosting account. In this case, the tool is likely installed on your MySQL database. You typically need to access your account management dashboard and go to your cPanel home page.
If you have trouble with this, it’s best to reach out to your hosting provider by phone. They’ll be able to walk you through how to access this management tool via your hosting provider’s account page.
The second and more complicated way is by running your own server and installing PMA manually, but this is easy to do if you are familiar with server setup and management. For example, you can set up an Ubuntu server using a service. All you need is the command apt-get on Linux or use the Composer tool for a Windows server.
This process depends on your hosting provider. Typically, once you log in to your hosting website, you would find your website hosting product, then select the WordPress installation you want to manage, and click on “Manage” or “Settings.” This may open up a link to the tool, but typically, you will be directed to cPanel.
Note: If you have never set up a WordPress installation, then you would need to install WordPress first to set up your databases. Most of the time, PMA is installed with your MySQL database. Here is a guide to manually install WordPress through cPanel.
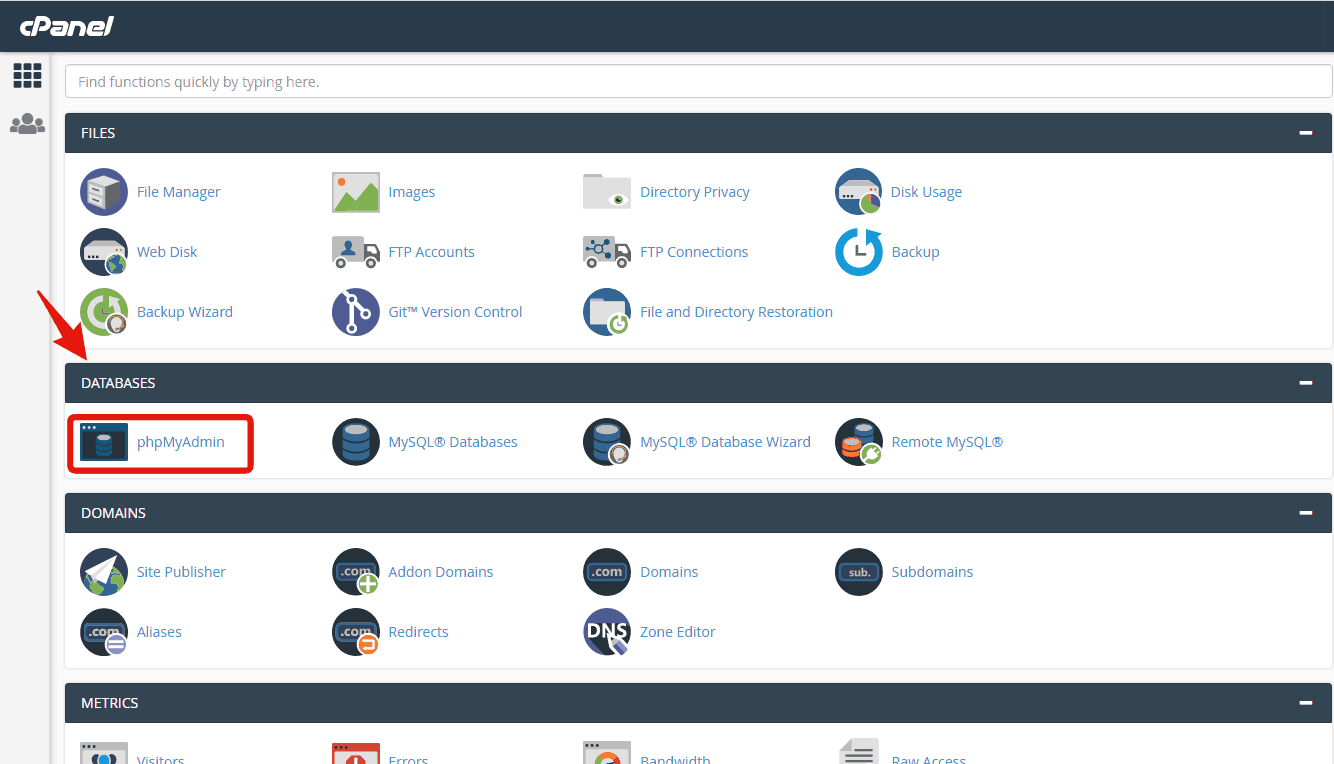
You can find PMA under your database section. The screenshot above shows where this management tool exists in the modern cPanel home page.
Once you click on the tool, it will launch the application and open a page that should look like this: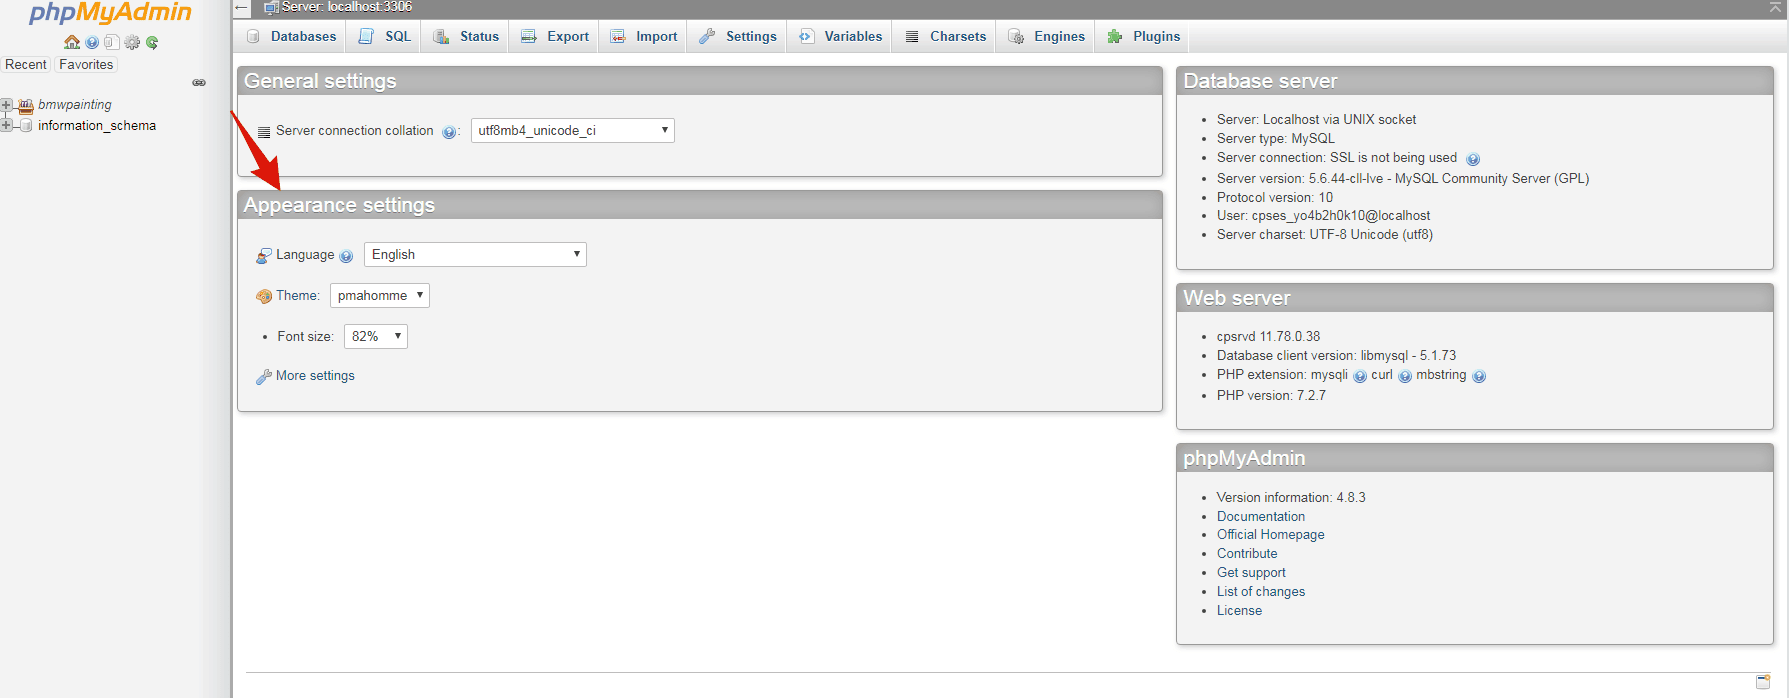
You can start working on your database management protocols right away, you may want to change some of the Appearance settings first for the interface. My default this is set to “pmahomme” and has a font size of “82%,” but you can make the font bigger or change the colors if it would make it easier to work with.
Note: Appearance settings simply change the look of and not your WordPress site.
Four Common Tasks to Do with phpMyAdmin
The following tutorials consider what most people like to do with your MySQL databases including:
- Check the status of your WordPress: You can see all traffic, connections, failed attempts, and other status stats on your WordPress with PMA.
- Access and edit your WP database: You can edit content, post, and security information for your site directly through the tool’s home page.
- Add or remove a WP database Perhaps you want to use your server to set up a new installation, you can create a new WP database here or you can remove one to save some space.
- Backup, export, and import a WP database: Perhaps you want to set up a WP database from one that already exists, you can use PMA to backup your WordPress files and import a database so you never have to worry about losing your website.
- Optimizing your WP database: Save on space by optimizing fragmented tables and ensure that your site runs fast.
- Reset user passwords and add or edit user accounts
- Secure your WP database: We provide a guide with several ways to make your WordPress site safe against common hacks.
How to Check the Status of Your WP Database
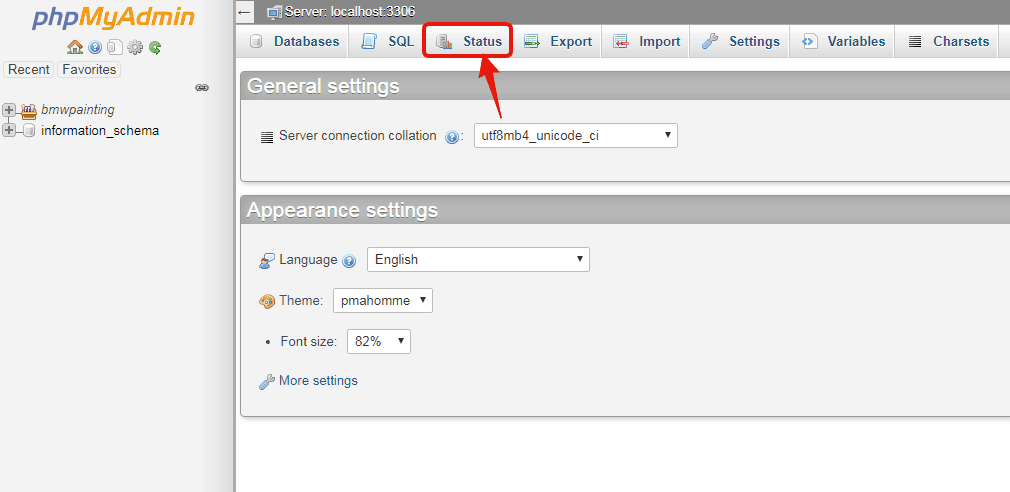
- Once inside of the administrative tool, click on “Status” at the top of your menu.
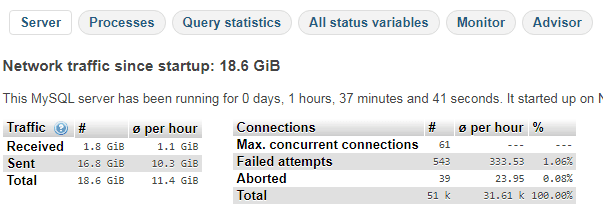
- You can now see all of the traffic and connection information for your website. You can also use the sub-menu to access information on other processes, queries, monitoring, and more. It’s best to use these figures to see if your website has had any downtime when it’s gone offline and if you are in need of more bandwidth.
How to Access and Edit Your WP Database
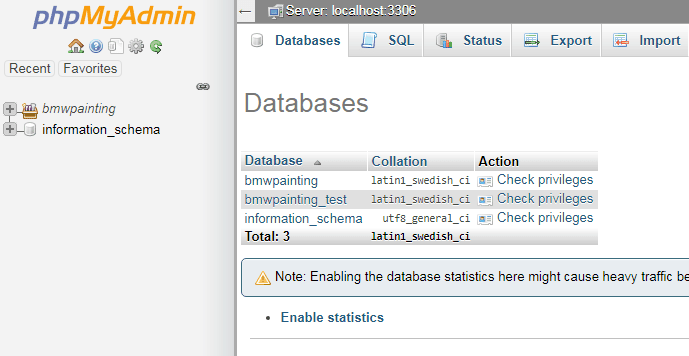
You can see all of the databases available on the sidebar or by clicking “Databases” at the top of your menu. In some cases, you’ll see “wp” noted in the name of the database. This is the main prefix to denote “WordPress.”
Once you locate the database you want to edit, you simply need to click on it to see a list of tables.
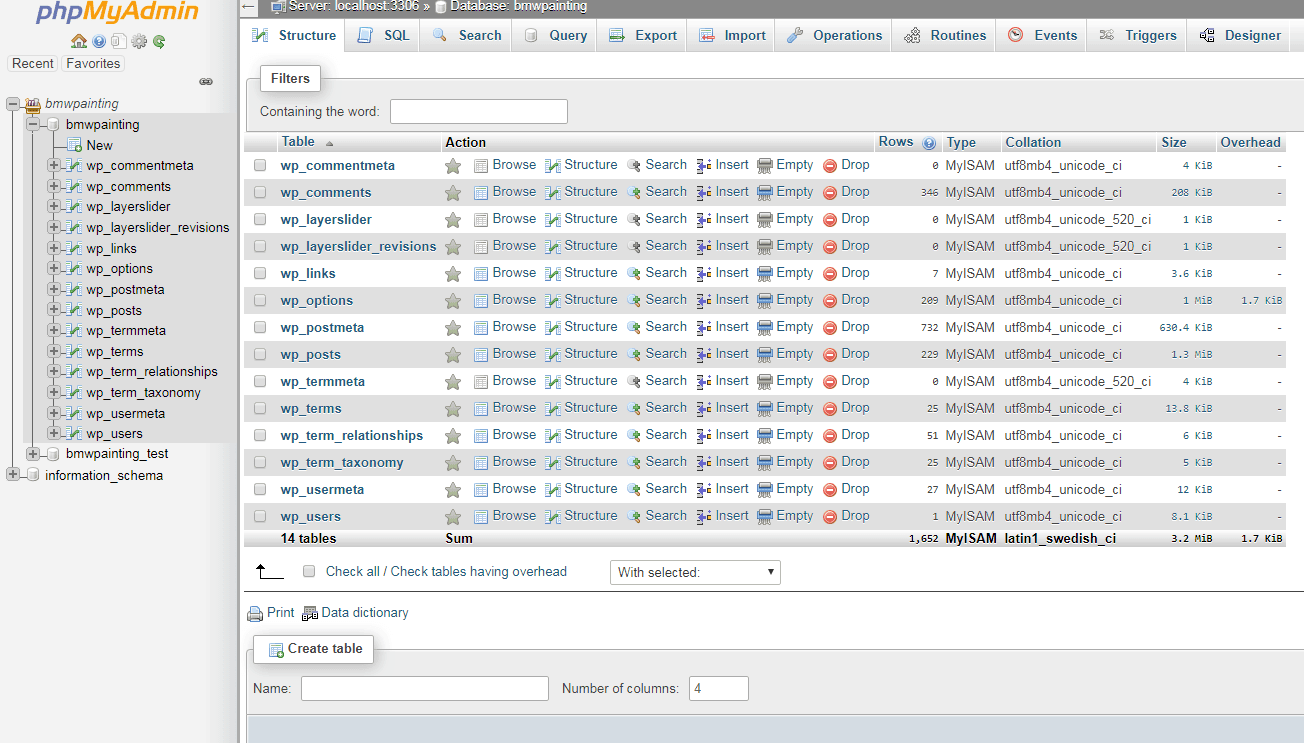
You can edit any table, but you should be careful as these tables contain files to live live WordPress site. You should always create a backup of the database first, and you may want to create a “test database” where you can play with settings and edit databases without working on the live site.
Example: Accessing and Editing Posts in PMA

You can click on the wp_posts table and select “Browse” to see all posts you’ve made. Each part of the post can be edited from this interface. You may want to click on a post to quickly change content, edit a bad photo, or change other information. If you click “Drop” or “Delete” on a post or its content, it will be removed from the server.
Backing Up, Creating, and Removing WP Databases with phpMyAdmin
Deletion
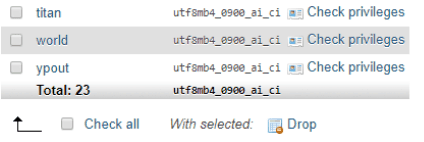
Deleting a database is the easiest part of this guide. You can simply go to your home page, click on “Databases,” and then select the database you want to delete. At the bottom, click “Drop” to delete the database. This permanently removes the database from your server.
Create New WP Database

Go back to the “Databases” tab. If you have the option to create databases, you will see “Create database” at the top of the page. In some cases, your hosting provider may not allow you to add databases through PMA.
You can enter any name for the database. However, you should pick a name that makes it easy to identify if you need to come back late. Click on “Create” once you have entered the database name. A blank database is instantly created by PMA.
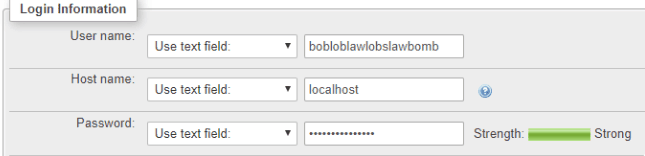
Click on “Privileges – Add user account,” then enter a username and password for a new WordPress administrator. In the host name field, select “Use text field” and type in localhost as the name. You should set up a very secure password for this user.
Next you will configure the setup of your new WP database. This is located under “Database for user account.” Select “Grant all privileges on ___ database” (____ is the name of your database).
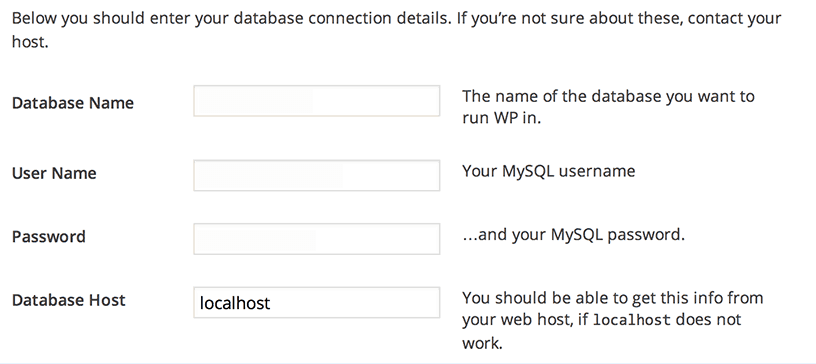
Click on “Go” to finish setting up the admin account. The WordPress installer will then load and asks you for more details, including the name of the database, your MySQL username, your MySQL password, and your account info.
Note: You’ll use the name of the blank database you just set up. For MySQL login, you can return to cPanel and click on “MySQL” under databases to get your login information. If not available here, you may need to contact your hosting provider.
At this point, WordPress will automatically install the files you need and set up your new site for you.
Backing Up, Importing and Exporting Databases
You can export your current databases and import databases through PMA. This is a handy tool if you want to backup a WP database or migrate your database to another host manually. You can use an FTP client to do this or you can do it directly through PMA.
Exporting a Database

From the main page of PMA, navigate to the “Export” page at the top. Clicking this opens the export tool where you can select “Quick” or “Custom” export. The “Quick” option includes all of your database’s tables currently. This is the fastest option to backup a whole WP database at once.
- ☑️ Select the “Quick” option to instantly backup your database.
☑️ Select “Custom” to manually select what you’ll export.
☑️ Choose “SQL” under “Format” and then click “Go.”
☑️ A dialog pops up asking you to save the file to your computer.
☑️ Save your backup with a unique name to a folder on your computer you won’t forget.
☑️ The SQL file containing all of your WP database information downloads to your computer.
Importing a Database
If you need to migrate this database to a new server or your website goes down and you need to quickly upload a backup, you can do so through PMA.

- ☑️ To import your saved database export, just click on “Import” from the PMA home page.
☑️ Click “Choose File.” Locate the database file you want to import and upload it. An exact copy of your database is now located on your server.
It’s that easy!
Optimizing Your WP Database with phpMyAdmin
After you have had your WordPress site for awhile, you may see fragmented tables. These are memory waste dumps that increase your database bandwidth usage and slow down your query times. Essentially, it’s time to optimize!
MySQL allows you to use a command that optimizes your WP database within seconds. You simply go to your PMA and click on your WP database that you want to modify. All of the tables will appear. At the bottom, click on “Check all” and then to the right of that, select the dropdown and click “Optimize table.”
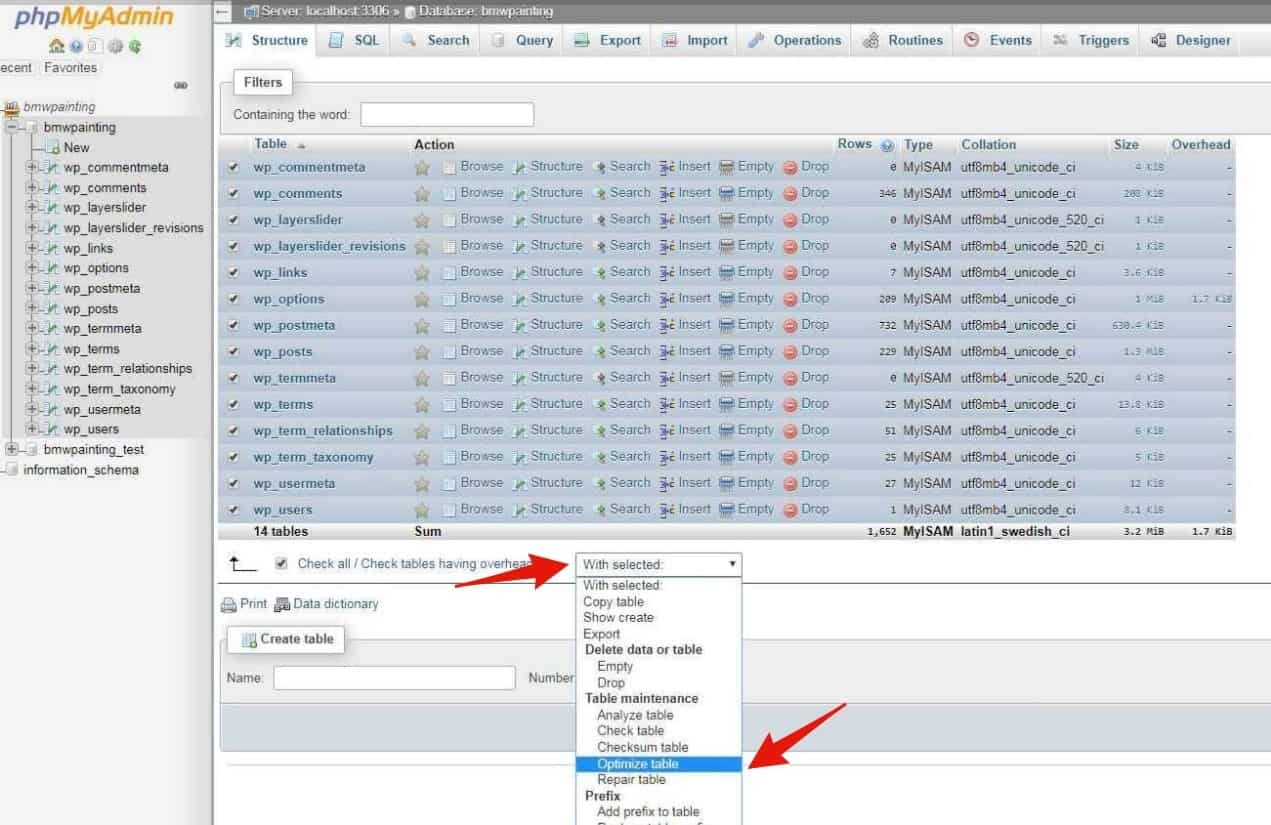
Once finished, your tables will have been defragmented and new memory should be freed up for use. In addition, your WordPress site may run faster.
Managing WordPress Users and Passwords from phpMyAdmin
How To Reset Your WordPress Password in PMA
Have you forgotten your password to your admin account on WordPress? Never fear! You can go back to PMA’s home page, select the WP database for the right password, and then click on the table “wp_users.”

Click on “Browse” to show all users and passwords. You can manually change the passwords from here by clicking “Edit” next to the password.
Add a New User or Change Username for WordPress in PMA
If you want to edit or add users via PMA, navigate to the same “wp_users” table as noted in the above guide.
To change a username:
- ☑️ Click on “Browse” next to “wp_users.”
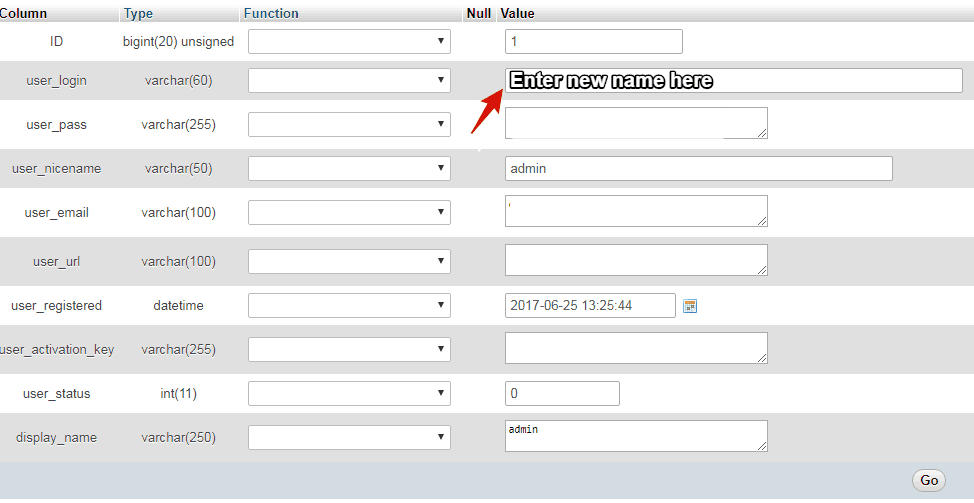
☑️ A list of users will appear, click “Edit” next to the user you want to change.
☑️ Next to “user_login,” you can manually enter the new username.
To add a new user:
- Select “Browse” next to “wp_users.” Your user list will load. At the top of the page, click “Insert.”
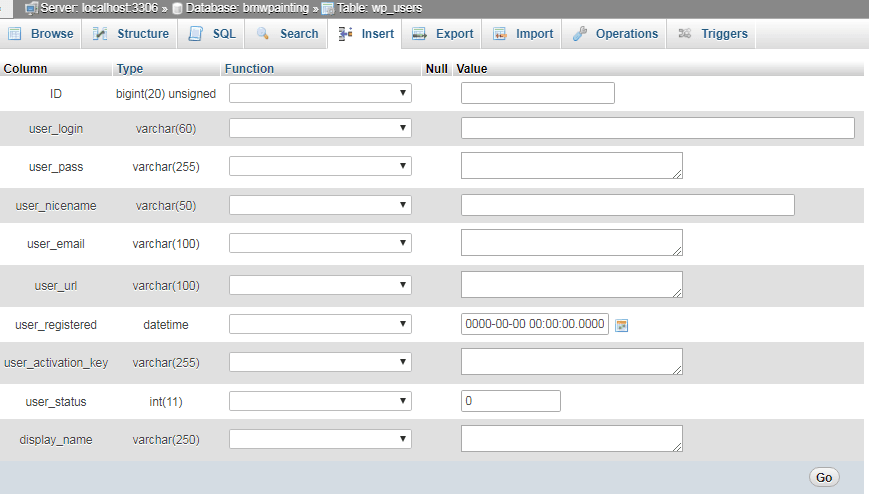
- From here, you will fill in all the fields on the form required to set up a new user.
☑️ ID: This is automatically generated, so leave blank.
☑️ user_login: This is the username that is used to login.
☑️ user_pass: This is the password used to login to your WordPress.
☑️ user_nicename: If you want a more URL-friendly username, you can input one here. This may be used if your username has special characters, but you want a URL with only letters.
☑️ user_email: Input a valid email address so that you can access your WordPress account emails.
☑️ user_url: You can leave this blank or enter the URL address of your WordPress site.
☑️ user_registered: Select CURRENT_TIME in the function column, so it automatically adds the time.
☑️ user_activation_key: Leave blank.
☑️ user_status: Leave blank.
☑️ display_name: You can enter the user’s name or nickname as it would be displayed on posts and articles in the author field.
Click on “Go” to add the user.
Changing User Privileges in PMA for WordPress
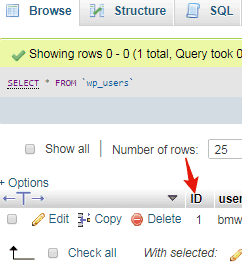
Before you change user privileges, you must already have the user ID. To get this, you will navigate back to “wp_users” table and click “Browse.” Then, you can select the ID from the column.
To change the user’s privileges, then go to “wp_usermeta” from the tables list. Select “Browse.”
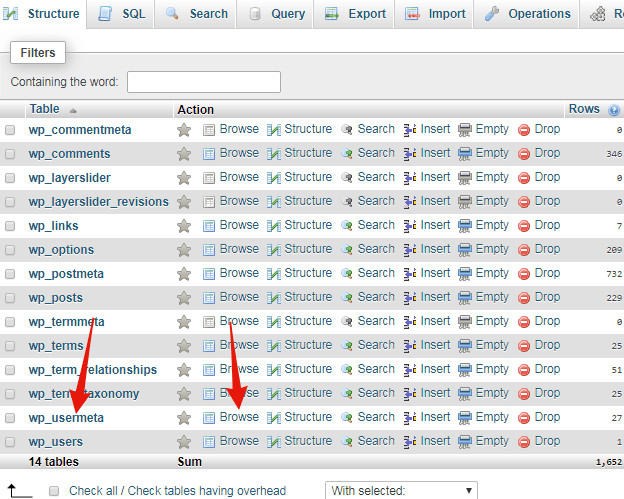
At the top, click on “Insert.” This loads the form to change permissions. Use the guide below to add admin privileges.
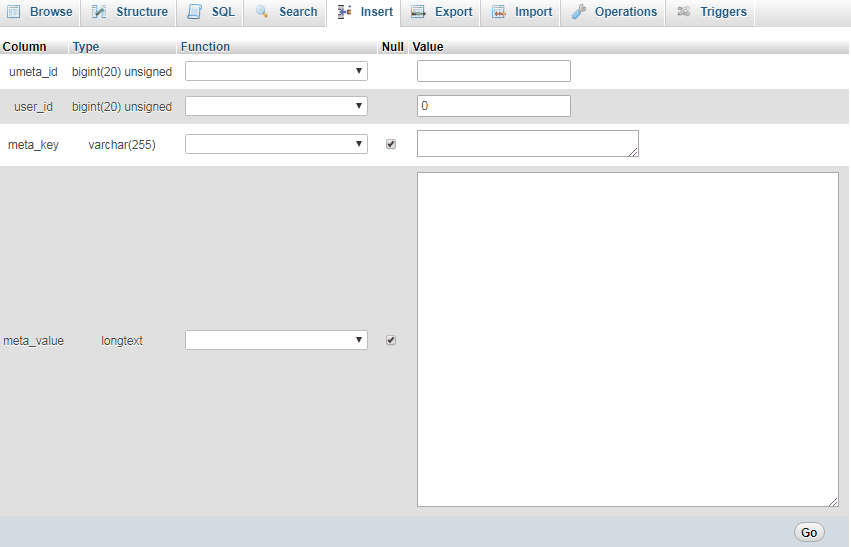
- ☑️ umeta_id: Leave blank. This automatically fills in.
☑️ user_id: Enter the user ID you selected earlier from the user you added.
☑️ meta_key: Enter wp_capabilities in this field. (You may have another prefix for your tables).
☑️ meta_value: Enter the following serial code: a:1:{s:13:”administrator”;s:1:”1″;}
Click “Go to save your changes and add the new permissions.
How to Secure Your WP Database in PMA
While every site is susceptible to hacks and cyber bots, there are a few measures you can take to prevent yourself from being completely open. These steps will make it harder for hackers to infiltrate your site.
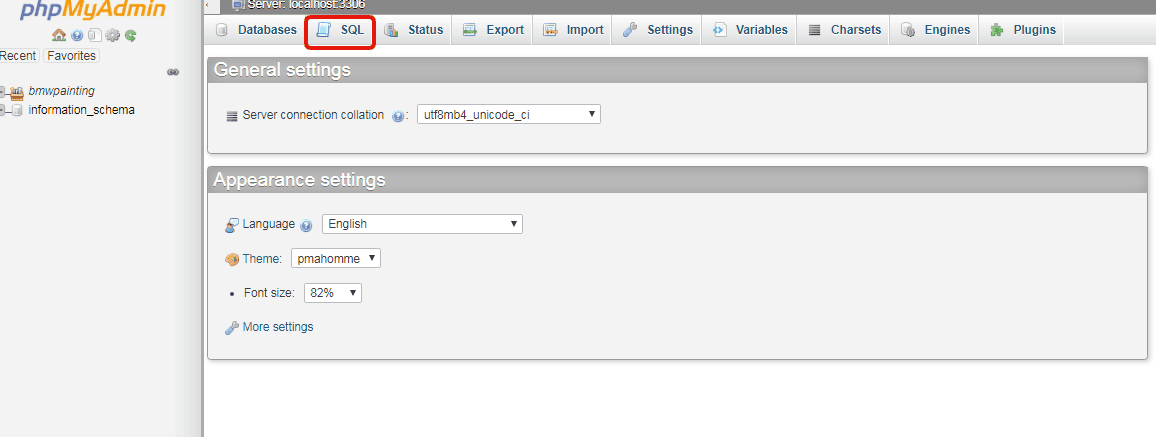
Change Your WP Database Prefix
By now, everyone knows that the standard prefix for WP databases is “wp.” This is why you see wp_users or wp_posts.
You can do this in PMA by navigating to your home page and clicking on “SQL” at the top of the menu.
Search Using an SQL Query
To manually go one by one and change the prefixes is tedious, so you can use a SQL query to make things faster. We’ve prepared a query for you to use below. You can copy and paste this into the SQL box to change all of the prefixes to wp_b123456 instead.
You can find this number and change it to any prefix you like following the same format as wp_insertnumber.
RENAME table `wp_commentmeta` TO `wp_b123456_commentmeta`;
RENAME table `wp_comments` TO `wp_b123456_comments`;
RENAME table `wp_links` TO `wp_b123456_links`;
RENAME table `wp_options` TO `wp_b123456_options`;
RENAME table `wp_postmeta` TO `wp_b123456_postmeta`;
RENAME table `wp_posts` TO `wp_b123456_posts`;
RENAME table `wp_terms` TO `wp_b123456_terms`;
RENAME table `wp_termmeta` TO `wp_b123456_termmeta`;
RENAME table `wp_term_relationships` TO `wp_b123456_term_relationships`;
RENAME table `wp_term_taxonomy` TO `wp_b123456_term_taxonomy`;
RENAME table `wp_usermeta` TO `wp_b123456_usermeta`;
RENAME table `wp_users` TO `wp_b123456_users`;
Changing Your MySQL Username and Pass
Your database user and password should be extremely hard to guess. This means adding special characters or using a password generator to ensure a strong password. In addition, you shouldn’t keep your password in any management folder open on your computer or website unless it’s also strongly secure.
Related reading: Error Establishing a Database Connection
Use a Third Party WordPress Security Plugin
If you are worried about your WordPress security and want extra protection, you can use Sucuri. It’s one of the top WordPress security plugins because it actually notifies you have attempts to break into your database before your website ever goes down.
Also, it wouldn’t hurt to get one of the best VPNs for your personal network to avoid data theft.
Wrapping it up
We hope this guide gave you some insights into how to set up, access, and optimize your phpMyAdmin (PMA). If you ever need any more guidance about navigating and securing WordPress, feel free to check out our web hosting research and analyses.