Advertising disclosure
Hosting Canada is community-supported. We may earn a commission when you make a purchase through one of our links. Read Disclosure.
How to Setup GZip Compression


 Recent statistics suggest that more than 50 percent of online shoppers in the U.S. will abandon a purchase if the website that they are browsing on loads too slowly. Accordingly, it’s vital that you ensure the fastest possible load times.
Using the right Canadian web host helps, but there are other options. One of the quickest is to enable GZIP compression.
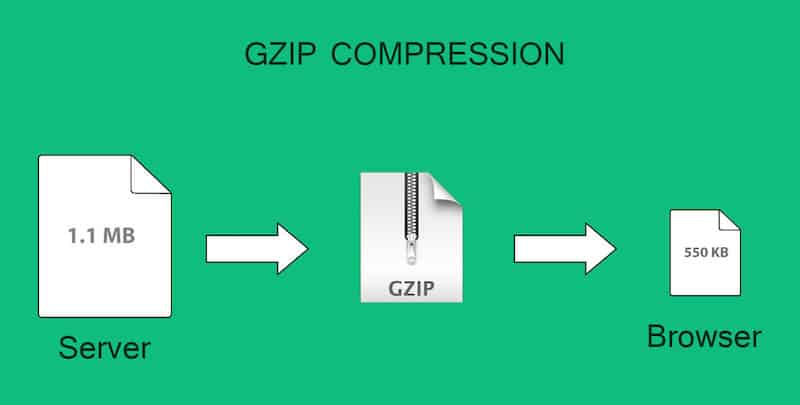
GZIP compression decreases the size of your webpages, which makes them faster to load. It’s supported by all web browsers, but it may not be enabled on your server.
Defining GZIP Compression
GZIP’s purpose is the compression of files. It’s a server-side product that reduces the size of JavaScript files, stylesheets and HTML. Some WordPress users have reported a reduction of 70 percent with GZIP compression. That’s impressive, and using GZIP is really easy.
Webmasters who haven’t enabled GZIP may see a warning when using GTmetrix or Google PageSpeed Insights for speed testing.
In Google, you’ll see a suggestion regarding how compression decreases the number of bytes sent and received.
Similarly, GTmetrix makes a recommendation to use GZIP compression to decrease the transfer size of files.
Is GZIP Compression Enabled on Your WordPress Website?
GZIP is commonly used, and it’s not rare for web hosts to make this capability part of their default package. Similarly, browser support for GZIP is widespread, with some browsers having had this capability for nearly 20 years. Popular browsers such as Safari, Internet Explorer, Chrome, Opera and Firefox all are prepared for GZIP compression.

If you’re not certain that your web host provides GZIP compatibility, then you’ll want to check. Moreover, it’s worth taking some steps to ensure that GZIP compression is enabled on your WordPress website.
How to Check for GZIP Compression
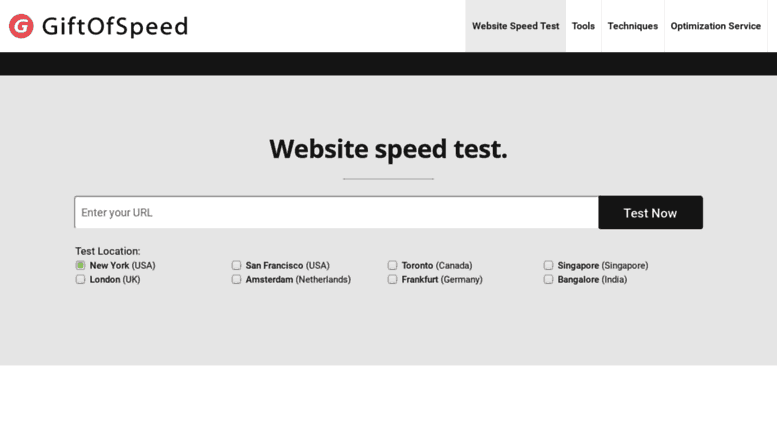
Two straightforward methods are available if you want to check on whether or not GZIP is enabled on your website. The first of these involves checking the GZIP Compression tool.
All you have to do is visit this site. Input your URL in the search box, then click “Check.” Within seconds, you’ll know whether or not your website is GZIP enabled. If so, it will tell you how much faster your website performed because of the compression. If not, it will return an error.
Another option is checking Google Page Speed Insights.
Keep in mind the GZIP compression also may be applied to static assets. Websites that serve assets via a CDN will want to check that these are enabled for GZIP as well. You can use the same tool to check GZIP readiness.
The other way to check whether or not your website is GZIP enabled is by verifying that the HTTP response header “content-encoding: gzip” is active.
For instance, Chrome users can open Chrome Devtools and review the first response header in the “Network” section. If the entry says “content-encoding: gzip,” then you don’t need to do anything.
Alternatively, click on the “View Large Requests” button, and you’ll see both the original and compressed page sizes. If a compressed page size isn’t displayed, then GZIP may not be enabled.
Enabling GZIP Compression
GZIP compression may be enabled via a WordPress plugin. Caching plugins are the ones that are most commonly used for this. Some of the more popular plugins for this purpose include WP Rocket and W3 Total Cache.
If you are on a shared host that uses Apache, then you have the option of modifying your .htaccess file. Before beginning, ensure that mod_filter is loaded on your server. If not, then you will receive an error. Then, insert this code in your .htaccess file:
<IfModule mod_deflate.c>
# Compress HTML, CSS, JavaScript, Text, XML and fonts
AddOutputFilterByType DEFLATE application/javascript
AddOutputFilterByType DEFLATE application/rss+xml
AddOutputFilterByType DEFLATE application/vnd.ms-fontobject
AddOutputFilterByType DEFLATE application/x-font
AddOutputFilterByType DEFLATE application/x-font-opentype
AddOutputFilterByType DEFLATE application/x-font-otf
AddOutputFilterByType DEFLATE application/x-font-truetype
AddOutputFilterByType DEFLATE application/x-font-ttf
AddOutputFilterByType DEFLATE application/x-javascript
AddOutputFilterByType DEFLATE application/xhtml+xml
AddOutputFilterByType DEFLATE application/xml
AddOutputFilterByType DEFLATE font/opentype
AddOutputFilterByType DEFLATE font/otf
AddOutputFilterByType DEFLATE font/ttf
AddOutputFilterByType DEFLATE image/svg+xml
AddOutputFilterByType DEFLATE image/x-icon
AddOutputFilterByType DEFLATE text/css
AddOutputFilterByType DEFLATE text/html
AddOutputFilterByType DEFLATE text/javascript
AddOutputFilterByType DEFLATE text/plain
AddOutputFilterByType DEFLATE text/xml
Webmasters running Nginx will add this code to their nginx.conf file:
gzip on;
gzip_disable "MSIE [1-6].(?!.*SV1)";
gzip_vary on;
gzip_types text/plain text/css text/javascript image/svg+xml image/x-icon application/javascript application/x-javascript;
Ensuring that GZIP is enabled on your WordPress website is one of the quickest and easiest ways to improve visitor experience. With the potential to reduce the size of your website by 70 percent, you have no reason not to ensure that compression is enabled. Your website visitors will certainly thank you for it, and you’re bound to see an increase in sales as well.
Too Hard? Try These Options
- Ask your host to set you up. Companies like BlueHost or SiteGround will get their tech support to get this going for you.
- Use WP Rocket which has a gZip option.
- Watch the video below