Creating a hosts alias can really simplify your access to websites and servers. Tweaking this file might look daunting and complex at first, but here’s the scoop—it’s actually not that hard at all. Once you’re used to it, it becomes pretty clear-cut.
This guide walks you through every step. By the end, you’ll have a solid grasp on how to add aliases and manage IP addresses effectively, while also making your workflow much smoother.
What is a Hosts File?
The hosts file is basically a little notebook tucked inside your computer. Think of it as an old-school method your system uses to figure out where domain names actually live on the internet. When you type a domain—say, google.com—into your browser, your computer isn’t sure where to head straight away. So, what does it do? It hits up a DNS server (a big directory for websites) to figure out which IP address matches up with that name.
The hosts file, however, lets you bypass that process. It’d be like you giving your computer a set of personal instructions and saying, “Hey, whenever I type hostingcanada.org, just go straight to 192.168.1.100.” This way, the system doesn’t need to ask the DNS server because it already has the info in its own little list.
What Exactly Does It Mean to ‘Set an Alias’?
An alias, in this case, is just a nickname or shortcut for an IP address. So, setting an alias in the hosts file, means you’re giving an easy-to-remember name (alias) to a specific IP address. You can then type the name instead of the number.
For example, you could tell your computer that ‘myshortcut.com’ should take you to ‘192.168.1.1’. Now, whenever you type myshortcut.com in your browser, your computer will instantly know it needs to go to 192.168.1.1.
Practical Benefits of Using the Hosts File
How can a hosts file make a difference in your day-to-day life? Here are a few ways:
| Benefit | How It Works | Example |
| Simplifies your workflow | Name servers with easy-to-remember names so you don’t memorize long IP addresses | Alias: tradingplatform.local for 192.168.1.50 |
| Easier tool testing | Quickly swap between different versions of your software | Use aliases for different platforms |
| Block websites | Stop distracting sites from loading | Block social media |
How to Set Up a Hosts File Alias: A Step-by-step Guide
It is important to understand how to open the hosts file and tweak it, whether you’re using Windows or Mac/Linux. Fortunately, the process is straightforward once you know where to go!
For Windows:
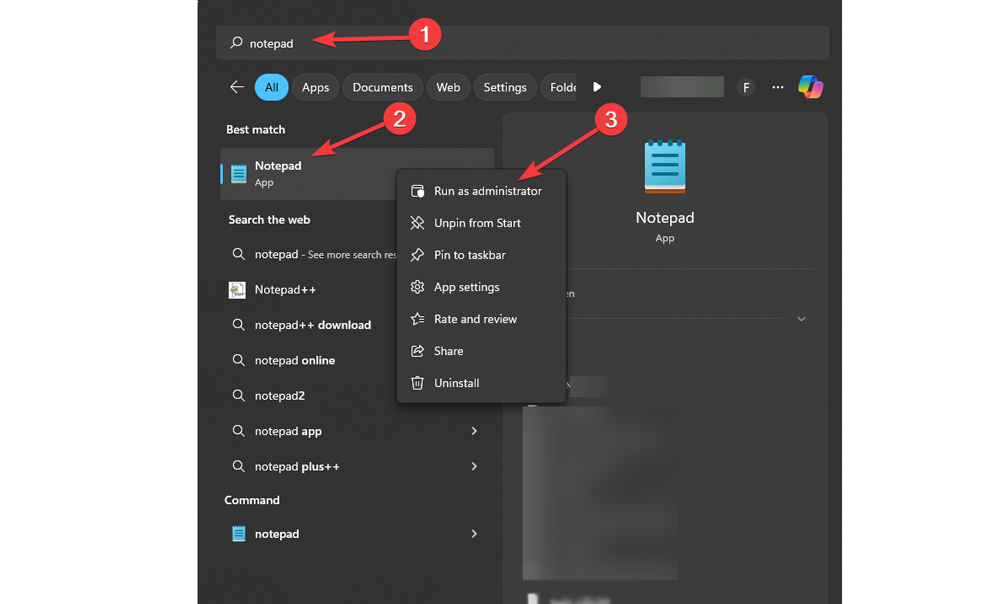
- Open Notepad as Administrator.
- Press the Windows key.
- Type Notepad and right-click on it.
- Select Run as Administrator because you need admin rights to edit system files.

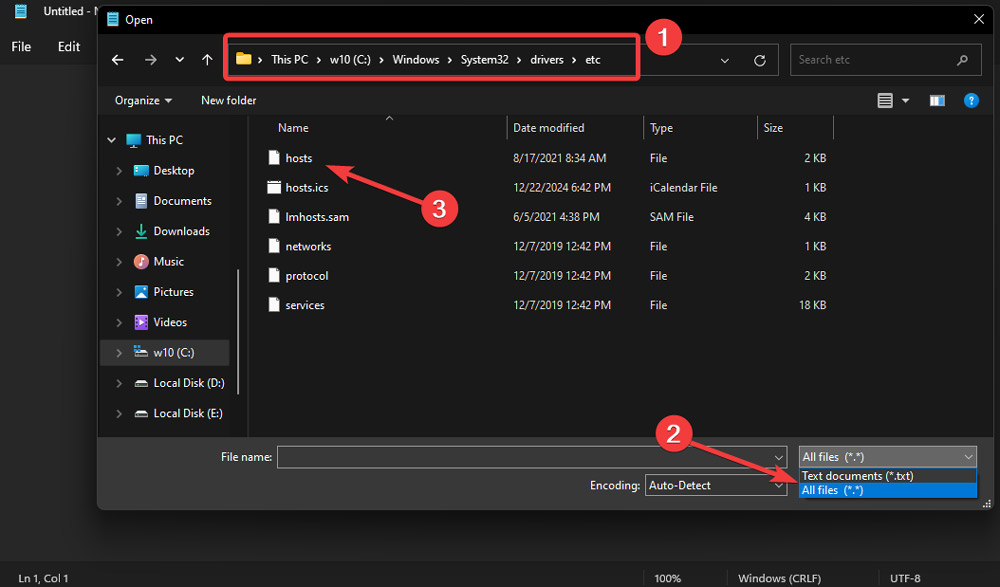
- Find and open the hosts file
- In Notepad, go to File > Open.
- Navigate to this folder: C:\Windows\System32\drivers\etc.
- You won’t see any files at first, so change the dropdown next to the file name to All Files.
- Open the file called ‘hosts.’

- Add the Alias
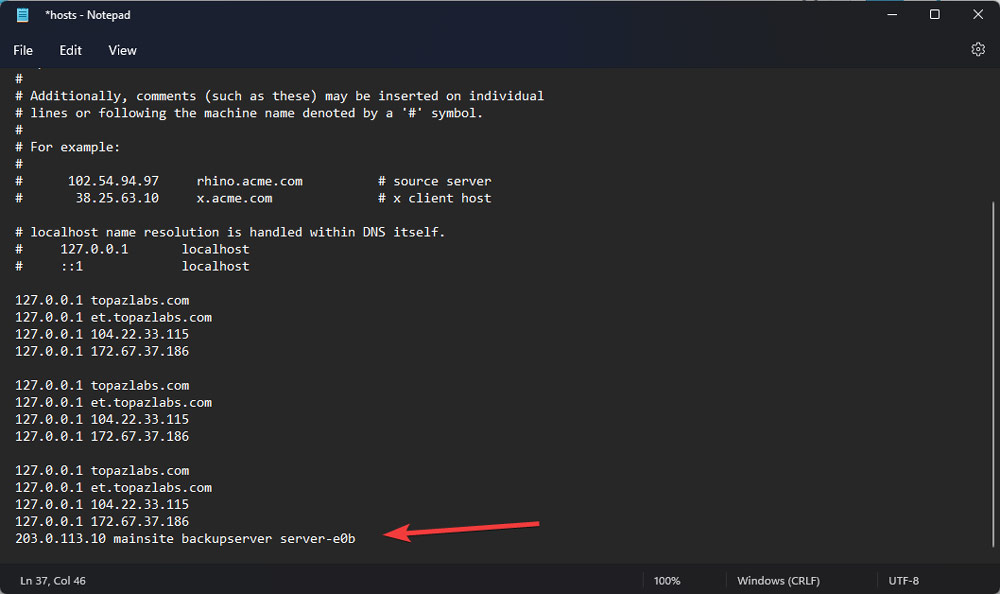
- Scroll to the bottom of the file and add a new line.
- Type in the new alias in this format: [IP address] [host name] [alias1] [alias2] For example: If you want to assign the aliases backupserver and server-e0b to an IP address 0.113.10, with the main host name mainsite. You’d enter: 203.0.113.10 mainsite backupserver server-e0b.

- Save the File
- Press Ctrl + S or go to File > Save
- If you can’t save it, make sure Notepad is running as Administrator.
- Flush the DNS Cache (optional)
- To apply changes right away:
- Open Command Prompt as Administrator (right-click, choose Run as Administrator).
- Type the command ipconfig /flushdns and hit Enter.

For macOS / Linux:
- Open the terminal
- On macOS: Press Cmd + Space, type Terminal, and hit Enter.
- On Linux: Open Terminal depending on your distribution (Ubuntu, Fedora, etc.).
- Open the hosts file
- In the terminal, type: sudo pico /etc/hosts
- Press Enter.
- Enter your password when prompted (this is to make sure you have the right permissions to edit the file).
- Add the Alias
- Scroll to the bottom of the file, just after the last entry (use the arrow keys).
- Add the alias like this: [IP address] [host name] [alias name 1] [alias name 2] … Example: Let’s say you want to assign the aliases newhost and myhost-e0a to an IP address 192.0.2.16 with the host (main) name myhost. You would enter: 192.0.2.16 myhost newhost myhost-e0a.
Note: Use the Tab key between the IP and alias, not space.
- Save the File
- Press Ctrl + O to save, then hit Enter.
- Press Ctrl + X to exit the editor.
- Flush DNS Cache (optional)
- To apply changes immediately:
- For macOS: Run this command to refresh the DNS cache: sudo dscacheutil -flushcache; sudo killall -HUP mDNSResponder
- On Linux, restart your network manager with: sudo systemctl restart NetworkManager
- To apply changes immediately:
Disclaimer: For reference, our team used the Pico editor. However, the steps will remain the same regardless of your software, be it Nano, Vim, Emacs, gedit, or TextEdit.


