Advertising disclosure
Hosting Canada is community-supported. We may earn a commission when you make a purchase through one of our links. Read Disclosure.
How to Move Http to Https on WordPress


 One of the best ways you can step up the quality of your website and provide better speed and security to your visitors is by moving from HTTP to HTTPS.
Yet many WordPress users aren’t sure how to do this and might be worried about jeopardizing the stability or consistency of their website if they make such a sweeping change.
Today, let’s go over how you can move to HTTPS on your WordPress site.
What is Https?
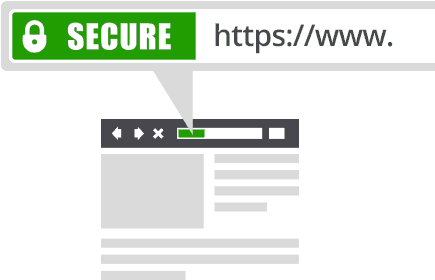
HTTPS is a convenient acronym that means “hypertext transfer protocol secure”. It’s a communication protocol that web browsers use to direct web traffic. It essentially allows a web browser and a website to send data back and forth without having to worry about the data being easily compromised.
It’s also very similar to HTTP, which is the same acronym except for the “secure” part; thus, it’s still a communication protocol used all over the Internet, but it doesn’t come with added security. Because of this minor flaw, HTTPS is the most widely used communication protocol across the entire Internet.
You’ve likely seen HTTPS markers on websites you visited without actually noticing. For starters, websites that have this communication protocol will start with https://. Other sites also include a padlock symbol, which indicates that they have SSL certification: another important security step most serious WordPress users should take advantage of.
Why Do You Need It Over Http?
HTTPS is better than regular HTTP because it uses basic encryption for data that is sent between servers and websites. Any information or data exchanged is automatically subjected to encryption protocols, making general data more difficult to scoop by bots or hackers. Still, it’s a fair question to ask whether it’s actually necessary for your site.
Why Bother Moving to Https?
It’s Faster for Loading
For starters, HTTPS provides faster loading times for you and your visitors. You can easily see this speed difference yourself by checking out a free “vs” resource aptly titled httpvshttps.com.
 You can generally expect faster data load speeds between 70% and 90% faster if you use HTTPS over its less secure cousin.
This is also great for anyone trying to run an online business or who want to better service their website visitors. People these days have a low attention span and are likely to click away if the site takes more than two or three seconds to load. Get a better conversion rate using HTTPS for your WordPress site!
It’s Great for SEO
Speaking of boosting online business, HTTPS also provides benefits for search engine optimization. Google actually ranks pages that have this type of security in place higher than pages that don’t.
Even worse, Google Analytics actively blocks any referral data that you get from HTTP sites. If you run multiple blogs or want reference traffic from other websites, everyone should be using HTTPS for maximum Google rankings.
It’s Better for Trustworthiness
Perhaps more importantly, HTTPS is better if you want to earn the trustworthiness of your clients and visitors. Encryption is something that consumers are coming to expect more and more these days, and they are more likely to visit your site over and over if they are sure their data is being encrypted and isn’t easily misused.
It Protects Sensitive Information
This aspect is even more important in light of the GDPR, which states that websites need to take measures to protect the data of their users.
HTTPS is only a first step, but it’s a great way to be in line with certain GDPR regulations if you want international traffic or if you run an online shop. Nothing can sink an online business faster than all your customers’ data being scooped by a hacker.
Steps to Move Http to Https on WordPress
With all this out of the way, let’s dive into how you can move from HTTP to HTTPS with your WordPress site.
Backup Your WordPress Site
 Firstly, begin this process by backing up your website. This is actually something you should do whenever you make any changes to your site, like updating it or its plug-ins or making sweeping changes as part of a content push.
Backing up your website ensures that any mistakes you make aren’t permanent and allow you to get your site back to working condition if something goes wrong.
This is exactly the same. Back up your WordPress site so that when you make the move to HTTPS you don’t have to spend hours or days rebuilding everything from scratch in case there’s a glitch.
Implement SSL
Now it’s time to implement your SSL certificate. Don’t have one? No problem.
Chances are that your WordPress hosting provider (the people that you rent server space from) also allows you to either get an SSL certificate for free as part of your subscription package or you can purchase one for a monthly or yearly fee. These can run you anywhere from $0 to $100 a year, so choose your SSL certification source wisely.
Either way, you need to implement your SSL certificate to take advantage of HTTPS security. Implement in your SSL certificate will depend on where you get it; for instance, getting a free SSL certificate from Let’s Encrypt will result in a totally different implementation process than if you got it from your hosting provider.
Add Https to your Admin Area/Dashboard
Now it’s time to add HTTPS to your WordPress administration area. By doing this, you’ll essentially be securing the back end of your website and making sure that anyone who logs in (i.e. yourself and any other administrators) has their information exchanged securely between their home computers and the website servers. This is the first line of defense.
You can do this by opening your WordPress root folder and opening the wp-config.php file. All you have to do is add a line to the text before you see “That’s all, stop editing!”
Add this line:
Define (‘FORCE_SSL_ADMIN’, true) ;
Just so. This should implement HTTPS in your administration pages. Try to access the login page for your WordPress site and see if you can notice HTTPS in the URL address. If you don’t, you likely just made a typo typing in the above command, so go back and edit it until you see HTTPS properly.
Update Your WordPress Site Address
The next step involves updating your website address; you’ll spread your new HTTPS security to the rest of your WordPress site. This is a lot easier and less technical. Just go to Settings, then General.
You should see two bars describing your WordPress address and site address one right after the other. Add HTTPS to both of those and update those settings by clicking the save button.
You might not see these changes immediately unless you log out of your account and log in again afterward. We’d recommend checking this right away to make sure that the change was implemented properly throughout your entire site; click through several content pages if you want to be really sure.
Make Sure to Change Any Links in Content!
It’s now time to change links across your various content pages and any templates you might have. Your website builder might help you find these templates for easy reference.
Some WordPress plug-ins can automatically update any links you have across your content like Velvet Blues. Or you can use Search and Replace script. Just be careful when implementing these plug-ins and any widespread changes. If you can manage it, back up your website after every major change you make just to be sure.
You can also go through by hand and manually adjust any links you have if you don’t have a lot of content yet. But remember to catch everything on your site, including any external assets or resources that might be in your function files for theme templates. Here’s a good list:
- ☑️ JavaScript files, CSS files, or any assets referenced within
☑️ Web fonts
☑️ Internal links
☑️ Images, video and other media types
☑️ Iframes
We’d recommend changing these links to // rather than https:// since this will let the links finalize to the correct HTTPS version themselves.
301 Redirects
 We’re more than halfway there! Now it’s time to implement 301 redirects within your .htaccess. It sounds technical, but we’ll walk you through.
This essentially sets up a redirect that brings any new traffic automatically over to the secure HTTPS version of your website rather than the old HTTP version.
You can do this using .htaccess, which is one of the most important system files on your server, and usually located in your WordPress root directory.
Go to your FTP client and make sure that it’s showing any hidden files because the above .htaccess file is automatically hidden by default. On the off chance that you don’t have this file present right now, you can create yourself by making a plaintext file, naming it .htaccess, and uploading it to your WordPress root directory yourself.
Whether you find .htaccess or build your own version of it, write these lines to the letter:
- ☑️ <IfModule mod_rewrite.c>
☑️ RewriteEngine On
☑️ RewriteCond %(HTTPS) off
☑️ RewriteRule ^(.*) $ https :// %{HTTP_HOST}%{REQUEST_URI} [L,R=301] ☑️ </IfModule>
Adding this code will make it so that any visitors, including automated Google bots, will land on your HTTPS page and benefit from your new security. This also passively helps with your search engine optimization efforts.
Time to Test
After doing all this, it’s time to test and make sure that your hard work has paid off. Fortunately, doing this is pretty easy because you can visit SSL Test and insert your domain name to check for your new security.
It gives you a score for how well you’ve added SSL certification and HTTPS to your site as a whole, and even comes with a report that tells you details about any potential issues you might be experiencing.
It’s a great way to shore up other holes in your security or go back and fix anything you might not have implemented correctly (like the code sections if you aren’t used to making manual changes that way).
You should also double-check your entire site with SSL Check, which is an automated tool that catches any links that are still in the HTTP insecure version. This tool is especially helpful if you have a big site with lots of content to double-check over and over.
If everything checks out, you can push this version of your WordPress site out to live servers and start benefiting from the enhanced security and loading speed of HTTPS!
Update the Site Environment
 There’s one final step you have to complete before your process is over, though.
Remember to update your sitemap, although some search engine optimization plug-ins might do this by themselves.
Yoast SEO (which virtually everyone uses for optimization) may require you to switch the plug-in off manually once in order for its sitemap to update.
Then be sure to add your website to any webmaster tools you might have and use frequently. This just involves correcting your website address with the new HTTPS variety.
If you use a CDN, or content delivery network for additional speed, you’ll need to switch this to an SSL certified version. However, this may come with its own SSL certification; double-check your CDN service to see if you qualify.
Next up is checking on your analytics tools, like Google Analytics. Go into your profile and be sure to update all of your data collection tools and accounts with your new website address. Otherwise, they’ll be collecting data based on your insecure former website version, which is of no use whatsoever to you now!
Finally, go through any social share counts you might use on your site. These will need to be updated manually if you want that to be up-to-date, as you are technically running a new version of your website that did benefit from the former social shares.
Wrap Up
As you can see, switching from HTTP to HTTPS isn’t as hard as you might think and provide you with a plethora of benefits across all aspects of your website and online business. Hopefully, this guide was helpful, and you’ll be able to make the switch without any trouble at all. Let us know if you have more questions!