Advertising disclosure
Hosting Canada is community-supported. We may earn a commission when you make a purchase through one of our links. Read Disclosure.
Complete Shopify Guide for 2026
Written by
Gary Stevens

Edited by
Nathan Navidzadeh

Updated On
February 18, 2025

Reading Time
12 min
Shopify, the Canadian ecommerce company celebrating its 19th anniversary in 2026, is serious about taking market share away from the largest online store in the world.
Can this tech startup really take on eCommerce giant Amazon?
German tech entrepreneur Tobias Lutke, founder of Shopify, has not even reached the age of 40 yet, but he seems to be on track to becoming the next Jeff Bezos, and he is certainly encouraged by the potential he sees in the United States, a country where small and medium-sized companies currently conduct 98 percent of all business activity.
While it is true that big ecommerce names such as Amazon are getting bigger, the truth is that owners of small online store operations are collectively taking market share away from big brands, and they are doing so thanks to top eCommerce platforms such as Shopify.
Which provides everything from websites to inventory management and from supply chain all the way down to the shopping cart.
With a properly configured Shopify store, your chances of achieving online retail success can be significantly boosted, and following the steps in this beginner’s guide will get you closer to this goal.
How You Should Use This Shopify Beginner’s Guide
This guide will take you step-by-step through the process of getting to know the service. Even if you are already familiar with internet retail, it is not recommended that you skip ahead to sections that you may want to review first. We will eventually get to the administration panel / dashboard, but you don’t want to miss out on important steps along the way.
To get an idea of how serious Shopify is about competing against Amazon, consider the following: in mid-2020, the company played television commercials in twelve North American markets, and the campaign focused on how prospective ecommerce entrepreneurs can quickly get started with setting up a Shopify store.
In addition to these TV spots, which featured a “let’s make you a business theme,” Shopify also promoted its brand on radio stations, social media channels, and digital video outlets.
![]()
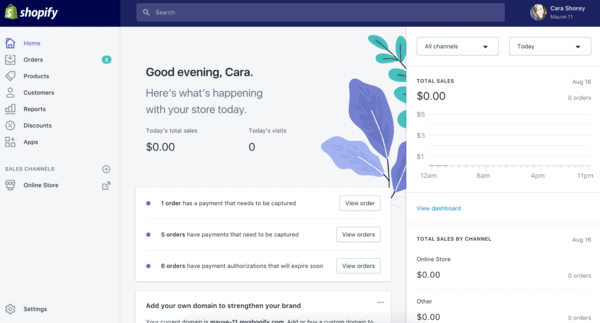
Here’s what you should know about Shopify in 2026: it is the largest, cloud-based online store for individuals who want to set up their very own internet retail operations.
If you are into internet shopping beyond Amazon and eBay, there is a good chance that the last online store you visited was a Shopify store; after all, more than half a million ecommerce business owners operate on this platform.
Choosing the Theme of Your Shopify Online Store
Online shopping is a highly visual activity, so you’ll will want to customize your store theme before adding products.
You can choose from hundreds of free and premium Shopify themes with different configuration levels, and you do not have to worry about coding.
This is a good time to browse through the Shopify Theme Store and start thinking about premium options for the future because they offer a greater range customization along with customer support.
Don’t forget to evaluate the reviews on the themes that interest you – some of them have mobile eCommerce strengths that others may lack.
Unless you are absolutely sure that your prospective buyers will only shop from desktops and laptops, you should only work with responsive themes that work well on smartphones and tablets.
To preview your theme, click or tap on the “View Demo” button. To set it as your store’s theme, click or tap on “Publish as my Shop’s Theme.” You can always go back and change themes if you choose to do so, but not before you play around with the settings and get a feel for how they work.
Changing the Settings of Your Shopify Online StoreIf you are the type of person who likes to tinker, you will likely spend some time on this beginner’s guide section.
Before we get into the actual store editing mechanism, let’s establish the bottom line of why you should edit your store settings: you do not want your shop to look like an eCommerce repetition of thousands of other stores operated by owners who did not bother to customize their themes.
What you should have in mind when customizing your theme is user experience+branding.
Before you start editing your theme settings, make a duplicate by selecting this option from the three-dot icon on the upper right hand corner of the theme screen. Start making visual changes that reflect your brand;
some ideas in this regard include choosing colors and fonts that mix well with your logo as well as with the images of the products you intend to sell.
Free vs. Paid Themes
You’ll also want to imagine how visitors will look at your store and how they will navigate and flow through the site. Put yourself in their shoes, as it were.
Free themes do not offer as much flexibility as their premium counterparts, and this is something for you to keep in mind.
Think about the positioning of the page elements and whether they are conducive to a pleasant shopping experience. The shopping cart icon, for example, is an element that you may want to move around so that it can be accessed easily without being obtrusive.
Since you saved a duplicate of your theme, you can now use it to conduct some A/B testing. Show one version of your Shopify eCommerce site to some friends or relatives and the customized version to others.
Make a note of their reactions and opinions, particularly with regard to how they flow through the shop. Remember that you will be promoting your store from external sites.
If, for example, you drive traffic primarily from a WordPress blog, you will want to customize the theme so that it matches the look of the site where traffic originates from.
To this effect, smart Shopify users who drive traffic from Instagram often use dark themes and square images that resemble photos from the social network. The idea is to promote visual continuity from the traffic source all the way down to the shopping cart.
With Shopify themes, you should always have a visual goal in mind. An authorized reseller of Los Angeles Lakers merchandise, for example, should play around with the layout so that it highlights yellow and purple color schemes.
Don’t forget to strategically place social media sharing buttons on your store.
Adding Products to Your Shopify Store
For those of you with prior eCommerce experience, you’ll be happy to know that the process of adding products to your Shopify site is a lot friendlier and easier than creating Amazon Standard Identification Numbers.
In essence, adding a new product can be done from your main dashboard screen; you will find the option to do so after clicking or tapping on the “Products” button on the left side, followed by the “Add a Product” button on the upper right corner.
At their most basic, Shopify products consist of two text fields: title and description, but their importance cannot be understated in terms of search engine optimization. The good news in this regard is that this platform already enjoys an SEO advantage similar to that of WordPress.
Shopify’s SEO Advantage
Google likes this eCommerce platform because of built-in SEO factors, including its security, theme layout shopping cart functionality, and others. It is up to you to provide SEO-friendly title tags and product descriptions, and this means writing for prospective buyers and not for search engine crawlers.
When writing product descriptions, include a healthy mix of features and benefits. Instead of thinking about how fast you can get visitors to the shopping cart page, think about how they can become engrossed in the product sections of your store.
The longer visitors spend on your product pages, the lower your bounce rate will become, and this will boost the ranking of your products on the Google search engine results page (not to mention, build trust with your audience).
You will notice that the product entry workflow has quite a few sections where you can input information, and a good rule of thumb in this regard is to provide as much data as you can.
eCommerce shoppers thrive on information, thus you should take advantage of every tag and every field. Not all information will be visible to shoppers, but it may be picked up by search engine crawlers.
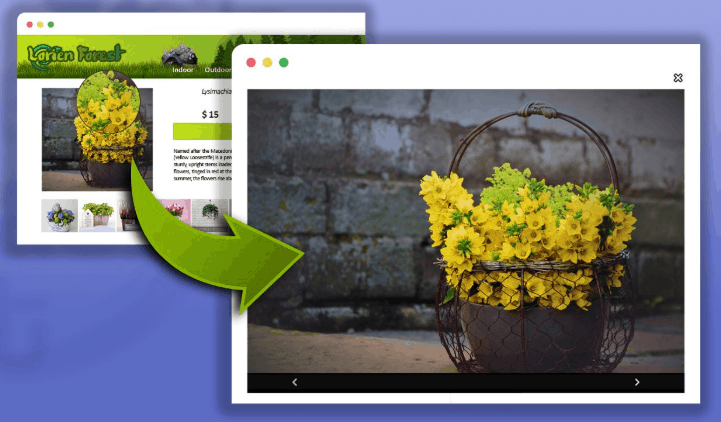 Shopify Product Images – A Few Tips
Shopify provides functionality similar to Amazon and other eCommerce platforms: shoppers can hover their mouse pointers over product images for an automatic zoom experience.
To get the most from this nifty feature, the pictures you upload should be of the highest resolution possible.
Needless to say, your product images are absolutely essential for turning casual shoppers into buyers and long-term customers.
For this reason, you should get into the habit of uploading high-quality pictures that convey the best features of your products. Uniformity is key when designing your store theme, try to make all your images follow the same dimensions and shapes, preferably square.
The images you upload do not have to be in a specific order, but arranging them into collections is a good practice that you should get used to. Collections are groups of products that shoppers may find more interesting when they are displayed together than when they are separate.
Ideally, collections should be made according to retail logic; for example, a store that is licensed to sell 🏀 NBA merchandise 🏀 can make collections for each team, or they can be made up of items that are on sale, or they can be grouped by conferences during the playoffs… Basically, any combination of products that shoppers would pay attention to.
The bottom line of collections is that they can make life easier for shoppers who prefer a friendlier experience than browsing through a product catalog one item at a time. These collections can be placed on your theme’s navigation menus for easy access.
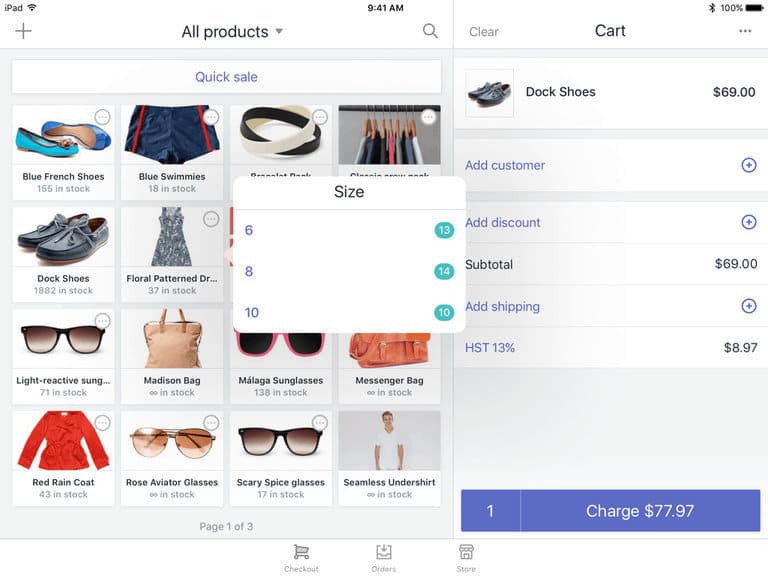
Pricing, Shopping Cart and Inventory
This is perhaps the most technical aspect of setting up your Shopify venture, yet it’s still much easier than doing so through the third-party FBA marketplace on Amazon.
The pricing of your products is entirely up to you; there is no reason to worry about Amazon undercutting you with special offers to its Prime members, and you can fully control when items go on sale.
There are just three pricing fields for you to manage from the administration panel: price, compare and charge taxes. With regard to the latter, you will have to research the commerce and retail laws that correspond to the jurisdictions where you plan on doing business, and don’t forget that collecting sales taxes means you will have to remit them to a revenue authority.
The price field is self-explanatory unless you want to show buyers that they are getting a discount on selected products; in this case, you should use the “Compare at Price” field since it will encourage shoppers to move quickly towards the shopping cart and payment sections.
The payment gateway selection process should take into account more than just commissions and transaction fees. Quite a few newcomers will choose Shopify Payments, and this is a good choice.
However, if you are selling iPhone accessories, for example, you may want to enable Apple Pay so that shoppers will feel comfortable after clicking on the check out option of the shopping cart section. PayPal is another popular gateway, and you may find it convenient if this is how you intend to receive your payments or if you already have a PayPal merchant account.
At the least, your choice of payment gateway should accept MasterCard and Visa, but you may also want to consider a solution that can process cryptocurrency tokens, such as Bitcoin, to accommodate more sophisticated – or starry-eyed – shoppers. 🌙 🤩

“Other” to find and activate the bogus gateway for testing. You will find the instructions on how to use this testing tool, which will require you to input a specific credit card number set up by Shopify for this purpose.
Beyond the shopping cart, you will need to start thinking about inventory and shipping matters. E-books and other digital products that do not require physical delivery should be indicated as such by means of ensuring that the appropriate check box is unmarked, and you can find this option within the “Inventory and variants” section of your products page.
Items that do not require delivery will not need you to input shipping weights; however, all other items will. If your product catalog is small, weighing each item and entering the corresponding data is easy. If this is not the case, you are better off getting this information from the manufacturer or distributor.
Product weights are tied to your shipping rates, which you can set from the “Settings” and “Shipping” section of your admin panel.
Once you start building a larger inventory, you will need to create a stock keeping unit (SKU) numbering system for the sake of organization, and you may find it easier to add new products using a comma separated values (.csv) file, of which you can download the correct Shopify structure from the “Import” option in the “Add a product” menu.
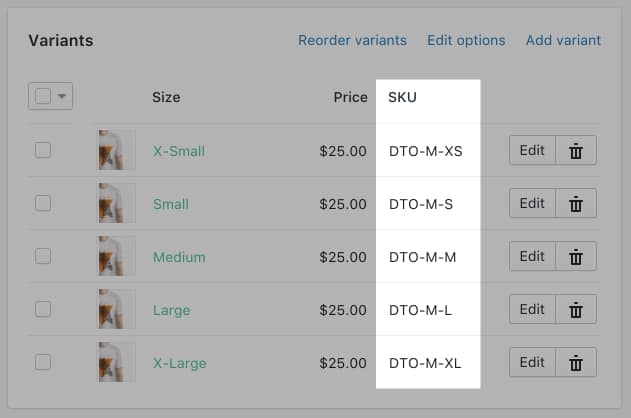
When setting up your inventory system, try to refrain from using product barcodes as SKU numbers unless you have obtained them yourself.
Product manufacturers, inventors and exclusive distributors can use the barcodes they order for their unique items as SKUs because they have retail control over their items, but this is not the case with third-party merchant services.
Some of the most effective SKUs to manage are alphanumeric; a few letters from the brand followed by three numbers should be enough to create a sequence that will make your retail activity reports easier to analyze.
Assigning a Domain to Your Store
All new stores get myshopify.com addresses upon creation. Before you go live with your store, you will want to add a domain, preferably one that you will use for marketing and promotion purposes.
When you are ready for this step, your options will include connecting, transferring or purchasing a new domain. If you choose the latter option, keep in mind that you will be dealing with the domain registrar and hosting service providers that Shopify has selected as business partners, and they may not necessarily offer what you are looking for.
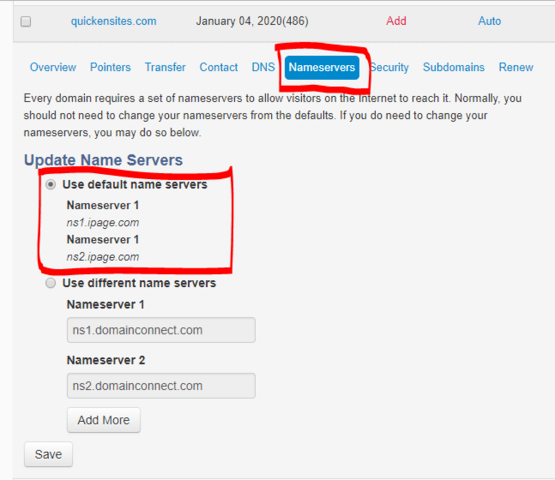
Your best bet will always be to obtain the store domain on your own, and for this you need to evaluate different domain registrars based on reviews you can trust. Naturally, selecting the right name for your store domain is crucial, which means that you should spend some time thinking about making the right call.
To connect a domain, go to your store admin panel and click or tap on Admin – Settings – Domains. Don’t forget to return to your web hosting admin cPanel to update DNS settings so that they match Shopify’s, which are 23.227.38.32.
Final Thoughts on Shopify
Whether you are new to the world of eCommerce or are coming from the Amazon Marketplace, you will find Shopify to be a comprehensive solution. As you can glean from this beginner’s guide, starting from scratch is easy – once you get comfortable and start looking under the hood, you will realize that you have made the right choice.
Although Shopify is mostly known as a solution for small business owners, the reality of this cloud eCommerce platform is that it can handle everything from a production chain to inbound logistics and from advanced dropshipping to outbound logistics. Your store can scale significantly if your sales begin skyrocketing, though you may have to retain the services of a developer once you get to this level.
Although this platform has been emerging in terms of recognition by major search engines such as Google, prospective store operators should not rely solely on SEO to drive sales; nearly all Shopify success stories involve clever and industrious online marketing campaigns.