

Advertising disclosure
Hosting Canada is community-supported. We may earn a commission when you make a purchase through one of our links. Read Disclosure.
WordPress Hide Featured Image

![]() WordPress is one of the most well-known and widely used content management systems across the globe. Businesses, freelancers, hobby bloggers, and entrepreneurs all use WordPress to bring their ideas to the public. As WordPress is the leader in the CMS industry, there are countless new WordPress sites published each day by experienced and new users.
WordPress is one of the most well-known and widely used content management systems across the globe. Businesses, freelancers, hobby bloggers, and entrepreneurs all use WordPress to bring their ideas to the public. As WordPress is the leader in the CMS industry, there are countless new WordPress sites published each day by experienced and new users.
While many of these users may know how to find reliable WordPress hosting and create a site through experience or tutorials, they likely do not know how to control specific features on their pages and posts. One such area where people may lack knowledge is the hide featured image option.
Many WordPress users add a featured image to each post for SEO purposes and design aesthetics. While this is good practice, there are times where hiding the featured image is better, and this guide will teach you various ways to do just that
What is a Featured Image?
 If you don’t know the name featured image, maybe you know the term thumbnail image. These two are essentially the same, and they’re often used interchangeably throughout the WordPress community.
A featured image, or thumbnail, is the small image you see next to a post title and sometimes an excerpt that serves the purpose of advertising a new blog post.
These images are used to improve the design of your webpage, engage readers, and improve your pages’ SEO score. As mentioned previously, it’s good practice to add featured images to your new posts. Nonetheless, scenarios do exist where it is better to hide the featured image.
As an example, imagine you have a web page that already has a lot of content and several images. On this page, it may be best to declutter it by removing some featured images.
How to Hide a Featured Image
As is true virtually across the board with WordPress, there is more than one way to accomplish something, and it’s not easy to say which method is the best. The following 3 ways are the most common methods to hide a featured image.
1. Check Your WordPress Theme for Functionality
WordPress offers users an array of themes, and nearly all themes provide featured image capability. However, not all of them offer the ability to hide these images. To figure if your theme does have the ability, you’ll have to check yourself. Follow these steps to see if your theme has the functionality you’re looking for.
- ☑️ Navigate to the dashboard of your WordPress website
☑️ Click on the “Post” tab from the left-hand navigation bar and select “All Posts”
☑️ Choose any post that you’ve already published and select the “Edit” button
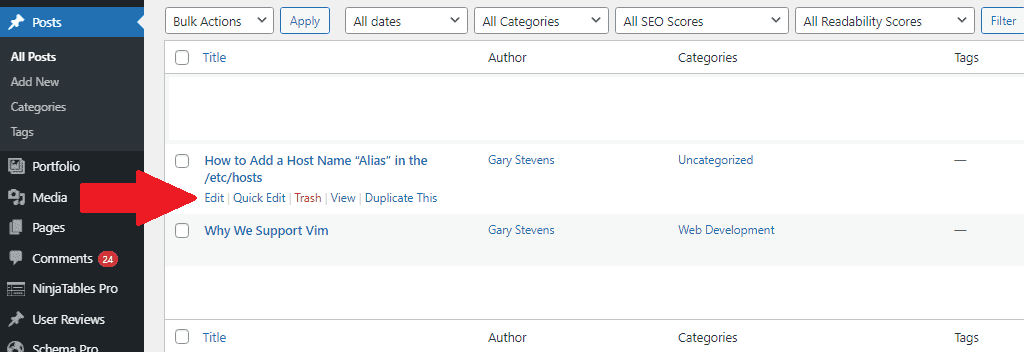
☑️ On the right-hand side of the page, you’ll find a set of editing options—look for a section titled “Featured Image” and click on it
☑️ Here—if it exists on your theme—you will find a button that says “remove featured image”
It’s important to note that your theme may not have this “Featured Image” section from the page editor. If you don’t see something with a similar title, search through all the available tabs on the page editor.
If you still don’t find a place where it mentions your featured image, you’ll have to move on to the next method.
2. Use Custom Code
Many WordPress users are comfortable writing, editing, and updating code files as it gives greater control over site functionality. However, it’s not necessary to have such experience to change the code of your website to hide a featured image. All you need to do is edit a CSS file, a type of file that adds style to your web pages.
Follow the steps below to change one of your website’s files.
- ☑️ Navigate to the Admin Panel
☑️ Go to “Appearance” and click on “Customize”
☑️ Next, click on “Additional CSS”
☑️ Copy the code from below and paste it into the file
.entry-content img {
display: none;
}
Adding the above snippet of code into your file will hide the featured images on all your posts. If you want to hide a featured image on a particular post, you can add the following piece of code to your file.
.post-12345 .post-image {
display: none;
}
To specify the post where you want to hide a featured image, change “1234” to the correct post ID.
Be sure to save the file after making your changes.
3. Find a Plugin
The last method to hide a featured image is to use a plugin—a piece of software that can be added to a WordPress site to add additional functionality. As WordPress is open-source software, anybody can create a new plugin and add it to the online store.
This also means anybody can recognize a problem, find a solution, and make it available to all WordPress users. With that in mind, it’s no surprise that today, several plugins exist that intend to make hiding a featured image easy. Now, all you need to do is find one.
As you search for plugins through your WordPress dashboard, you need to ensure you find the right one. You’ll need to read the comments and check to see if the plugin has been updated in the past year to verify the quality of the plugin.
If there are no red flags in the comment section and the plugin has been updated recently, you can rest assured that the plugin will work. From there, follow the steps below.
- ☑️ Install the plugin
☑️ Activate the plugin
☑️ Go back to your Dashboard and click on the “Post” section
☑️ Open whichever post you want to hide the featured image using the “Edit” button
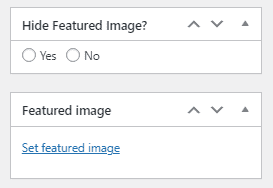
☑️ On the right side of the page, look for the section that says, “Hide Featured Image” and select it
☑️ Save the edits of the page and check to see results on your website
Assuming everything works fine, you can now edit any post to hide featured images.
The Bottom Line
Featured images are fundamental features in WordPress websites as most blog posts will use them.
Nonetheless, there are scenarios where it’s better to hide a featured image, and the three options above will teach you how to do that.