Advertising disclosure
Hosting Canada is community-supported. We may earn a commission when you make a purchase through one of our links. Read Disclosure.
How To Host Your Own Website
Oftentimes when people want to create their own website they have no idea where to start let alone how to host their website at home.
A large chunk of the population has never even thought about how a website works.
They just click their Internet Explorer 2003 icon and type in a website.
We miss you IE.
If you’re thinking about hosting a website from home, chances are you understand how servers and hosting work in general. You’re now looking for the final frontier – a chance to fully control your website from the ground up.
Sadly, hosting a website from home comes with a few obstacles such as limited bandwidth and huge electricity bills. Using a dynamic IP address rather than a static one also poses a few challenges.
There are two choices for hosting a website from home. The same two options the large hosting companies have on their servers. First up is Windows, as most people at home will be running a Windows machine. Next up is Linux, which is the preferred hosting platform in most cases.
Host a Website on Windows
Since most of you are probably reading this from your personal computer and using Windows as your operating system it will make the most sense for a lot of you to start with using your PC as your server.
Use Your PC as a WAMP Server to Host a Website
Using a WAMP installation program is the easiest way to get started rather than manually installing each package. I like to think of WAMP servers as making PacMan noises as they start to boot up.
Step 1: Install the WAMP Server Software
 WAMP stands for Windows, Apache, MySQL, and PHP. It’s much easier to just use a WAMP installation program rather than going through and downloading everything individually.
Reputable WAMP Server packages all have the most updated versions of the individual packages.
We recommend using WampServer. They make it easy to do.
Step 2: How to Use WampServer
After the software is installed, a directory will be automatically created.
The path should be found as c:\wamp\www.
Inside that directory you will be able to create any subdirectory that you need. This is where you can put any HTML or PHP files. WampServer labels subdirectories as projects but other WAMP software may call them something else.
Step 3: Test WampServer
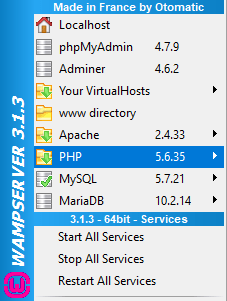 Testing the server is important to make sure nothing went wrong. To do this we need to create an HTML page.
The best thing to do is to place a file labeled “info.php” in the www-directory as an example. All you have to do is click “www directory” once inside WampServer.
Next, create a file and use this string of code:
1 <title>PHP Test</title>
After you save the file you will be able to browse http://localhost/info.php. This is where you will see the details of your PHP installation.
At this point, you will have the ability to create HTML and PHP file structures depending on what you need.
Step 4: Configure the Database
Most people will be using some sort of Content Management System (CMS) and most people using a CMS will be using WordPress.
This means that you will need a MySQL database.
You can create any MySQL database you want – or mess around with existing ones. WordPress will set up a new database for you that is compatible with their software.
When you open the phpMyAdmin login screen it will open as a new browser window. Feel free to leave the admin username as root. There is also no need to use a password.
Step 5: Make the Site Public
In order for people to actually access your website, you will need to find the Apache configuration file. This file should be httpd.conf and you can find it by going back to the WampServer menu and selecting Apache. Next, you can edit the file by selecting httpd.conf.
You should see two lines:
1 Order Deny,Allow
2 Deny from all.
Replace the lines with:
1 Order Allow,Deny
2 Allow from all.
Next, you will have to restart everything so this will work. There is an option stated as Restart all Services in the menu.
Everyone should be able to access your website now as long as there isn’t a PC firewall blocking requests.
Step 6: Domain Name
 If you’re hosting your beef jerky review site at home you probably want to name your domain something catchy and use it. If you don’t have a domain name yet, follow our guide on how to buy a domain name.
Your domain name will have a specific IP address, for this beefjerkyathome.com we’re going to use 000.000.000.000. Find the C:\Windows\system32\drivers\etc\ hosts file and add this line to it: 000.000.000.000 beefjerkyathome.com.
Next, we’re going to go back to the httpd.conf file to add a virtual host. You will have uncomment the line after the words, Virtual hosts. It will look like this:
1 # Virtual hosts
Include conf/extra/httpd-vhosts.conf
The last step is to add a manual file in the Apache directory. All you have to do is create a Notepad file and save it to C:\wamp\bin\apache\Apache-VERSION\conf\extra\.
The Notepad file will look like this:
ServerAdmin mail@beefjerkyathome.com
DocumentRoot “c:\wamp\www”
ServerName mysite.local
ErrorLog “logs/beefjerkyathome.com.log”
CustomLog “logs/beefjerkyathome.com-access.log” common
You will have to restart all services again and you will have a publicly accessible website using your domain name.
Hosting a Website on Linux
Since Linux is an open source software it makes it cheaper and easier to use than a Windows server. Most people don’t use Linux which could actually make it harder to set up a Linux server at home. With that being said, if you want to take the dive into the world of Linux this is how you do it.
Step 1: Install LAMP software
To begin installing the LAMP software open up the terminal and use the following code:
sudo apt install apache2 mysql-server php libapache2-mod-php7.0
You will be asked to enter a password for the MySQL root user. Next, to make sure everything has a chance to work you will need to restart the Apache web server.
 If you’re changing the global configuration of Apache at any time make sure to use this command:
sudo /etc/init.d/apache2 restart
Step 2: Confirm PHP
To actually check this you need to use a test PHP file in the web server root directory which can be found here: /var/www/html/
The PHP file used will be:
sudo echo “” > /var/www/html/info.php
To figure out which extra modules are available, use the command line:
apt search php | grep module
Step 3: Check the Database
Since you will probably want to use WordPress or other similar Content Management Systems you will need to check MySQL. Although, if you’re using Linux you might want to code your website from scratch.
To check if MySQL is working use this command:
service mysql status
Next, you will use the credentials that you typed earlier when MySQL was first installed:
$ mysql -u root -p
[now you will be asked for our admin password and enter the mysql prompt]
To create a new database you can use:
CREATE DATABASE test;
USE test;
If you’re using WordPress it will create a database for you automatically.
The last step will be to configure the /etc/phpmyadmin/config.inc.php file using the steps described here.
Step 4: Configure DNS
![]() You will need to configure Apache to use your own domain name.
You will need to configure Apache to use your own domain name.
The first step is to ensure that the DNS has an A record for your domain name. Whoever you bought your domain name will have tools to help you set up DNS records correctly so you don’t have to experience the pesky DNS server not responding error.
Once that is done, you should be able to see something like this using the dig tool. To request the A record for www.beefjerkyathome.com, type:
$ dig www.beefjerkyathome.com A
;; ANSWER SECTION:
www.beefjerkyathome.com. 86400 IN A
000.000.000.000
;; AUTHORITY SECTION:
beefjerkyathome.com. 86398 IN NS a.iana-servers.net.
beefjerkyathome.com. 86398 IN NS b.iana-servers.net.
Related Read: What is DNS
Step 5: Configure Apache
Our next step is to make sure Apache can accept requests from our domain and which directory the content should come from.
A directory will be needed for the beefjerkyathome.com domain. We will create that and then create a beefjerkyathome index.html file. Then we will worry about our filesystem permissions:
sudo mkdir -p /var/www/html/beefjerkyathome.com
sudo sh -c ‘echo “<title>beefjerkyathome.com</title><h1>This is my self-hosted site beefjerkyathome.com</h1>” > /var/www/html/beefjerkyathome.com/index.html
sudo chmod -R 755 /var/www/html/beefjerkyathome.com
We now have to create a Virtual Host file so Apache can recognize our domain.
sudo cp /etc/apache2/sites-available/000-default.conf /etc/apache2/sites-available/beefjerkyathome.com.conf
sudo nano /etc/apache2/sites-available/beefjerkyathome.com.conf
Then we edit the file to look like this.
ServerAdmin admin@beefjerkyathome.com
ServerName beefjerkyathome.com
ServerAlias www.beefjerkyathome.com
DocumentRoot /var/www/html/beefjerkyathome.com
ErrorLog ${APACHE_LOG_DIR}/error.log
CustomLog ${APACHE_LOG_DIR}/access.log combined
Almost there, reconfigure and reload Apache.
sudo a2ensite beefjerkyathome.com.conf
sudo service apache2 reload
With the heavy lifting almost done all you have to do is edit the local /etc/hosts file. Do this by adding this to your IP address and domain name:
000.000.000.000 beefjerkyathome.com
The internet can now visit beefjerkyathome.com and the world will rejoice with its newfound beef jerky knowledge.
Step 6: Install WordPress or Other Content Management System
This is when you will install the CMS that you feel like using. We recommend Wix or WordPress.
After installing the CMS, you should be done.
Related Read: Error Establishing a Database Connection
Why it Makes More Sense to Use a Hosting Service
Seeing how much of a pain in the butt it is to do this and how easy it is to use hosting services should make you wonder why anyone would want to do this.
Obviously, it can be fun to actually do this yourself and the learning experience is well worth it. Just doing this will make you understand how websites work and how hosting services host on a large scale.
When seriously considering growing a website – hosting it yourself just doesn’t make much sense.
Unless you have some crazy hardware and access to energy that most people don’t then you will want to use the best hosting service.
Your connections will be slower, dealing with the DNS configuration will be a perpetual pain, your electricity bill will skyrocket, and if anything breaks down it is completely on you.
It makes sense to take a look at dedicated hosting or VPS hosting instead.
Best Dedicated Server
With a dedicated server, you’re getting almost all of the benefits of hosting something yourself with none of the headaches. Not only that, you are getting more benefits because your speed and uptime will almost certainly be better.
Load Time: 520 Ms
Uptime: 99.9%
With next-generation infrastructure and utilizing Google Cloud Platform to power the whole operation, you will have fast speeds and high uptimes.
The security that Kinsta offers is better than anything that can be put together at home. They check the status of every single one of their websites every two minutes. Your website will be checked 720 times every single day to make sure it is up and running.
Best VPS Hosting
If you’re worried about money but also want access to your own server and scalability a VPS host might be the right option for you. With a VPS you will have your own dedicated server space with a unique OS instance.
Load Time: 2,232 Ms
Uptime: 99%
The great thing about InMotion is that it includes amazing premium features in their lowest cost tier.
Features like free SSD drives, free domain, free backups, SSH Access, unlimited disk space, free SSL certificate, and 24/7 customer support all come standard. On top of that, they have a 90-day full money back guarantee.
InMotion Hosting is a great option if you want a hybrid strategy that doesn’t break the bank. A high-performance option that focuses on reliability and redundancy without spending all of your money is something worth considering.
Conclusion
Just because you can host a website yourself doesn’t mean you should. It’s worth it as a fun little project but if you’re seriously looking to build and grow a website it makes almost no sense.
There are many great alternatives out there for hosting and there will be no headaches when it comes to keeping your website up and running at fast speeds.
References and image credits:
- KeyStoneWebStudios.com
- AmeraVant.com
- SilverScopeMedia.com


