Advertising disclosure
Hosting Canada is community-supported. We may earn a commission when you make a purchase through one of our links. Read Disclosure.
How To Backup & Restore WordPress
A guide to free, easy, and secure Backups for WordPress.
Whether your WordPress site is a business, an online shop, or blog, theres one feature it will always have need of: the need to be backed up!
In an era when hacking, malware, and server malfunctions are all an increasing risk, site backups have become a necessity, rather than just an option. Without a sound backup plugin in place, all the hard work you put into your WordPress is in constant danger of being lost.
For any site worth its salt, this simply isn’t a risk worth taking. But fortunately for you, theres plenty of effective, simple, and free WordPress plugins that will backup your website and give you the protection you need.
In the last 2 years alone, a staggering 91% of servers experienced unplanned shutdowns, wiping thousands of sites without backups. Business websites were hit particularly hard, losing (on average) tens of thousands of dollars in revenue. When the solution to losses like these is free, you really can’t afford not to backup! Fortunately, we’re here to show you how to get these plugins working for you and your website.
Backup Guard: Straightforward Protection
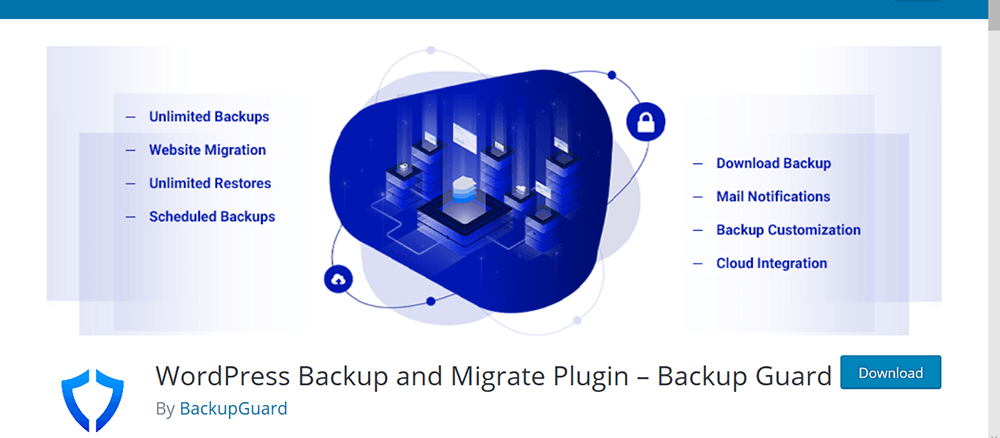
If you’re looking to get your backups done as quickly and as simply as possible, look no further than the free Backup Guard plugin.
Backup Guard: An Overview
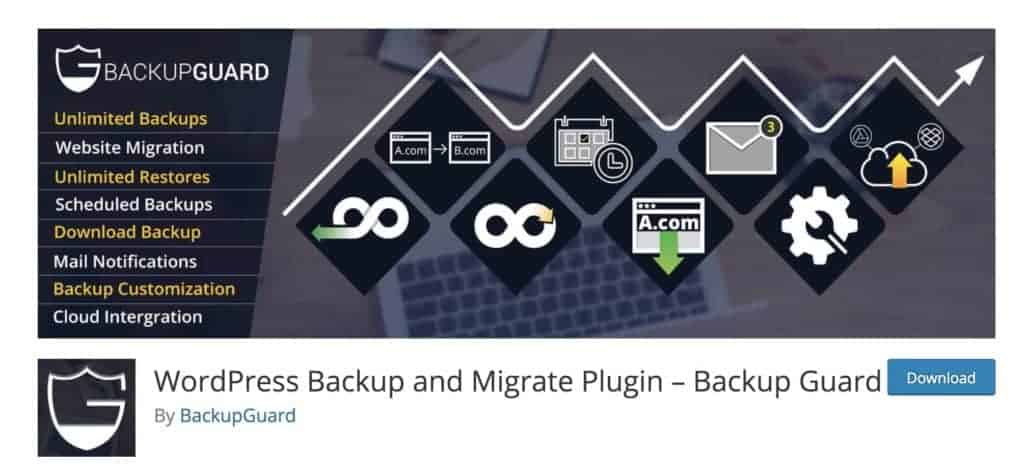
As one of the most widely used and highest rated WordPress plugins, it’s clear that this straightforward backup system works. It’s a rare thing to find both backup and restoration capabilities in a succinct and free package. Some of its main features include:
- ☑️ No-cap manual backups
- ☑️ Custom backup Option: files, database, or both
- ☑️ Dropbox compatible backup files
- ☑️ Quick, easy restorations
- ☑️ Option to cancel the backup process
- ☑️ Multiple WordPress Site Support
If this sounds like the right system for you, then here’s how to get it, and how to use it.
1. Backup Guard: Installation
You can install Backup guard easily from the WordPress dashboard. Search for it in the Plugins tab, then download and install. When the download and installation is completed, make sure it is turned on (Using the Activate button) and you’re all set to start.
2. Backup Guard: Backups
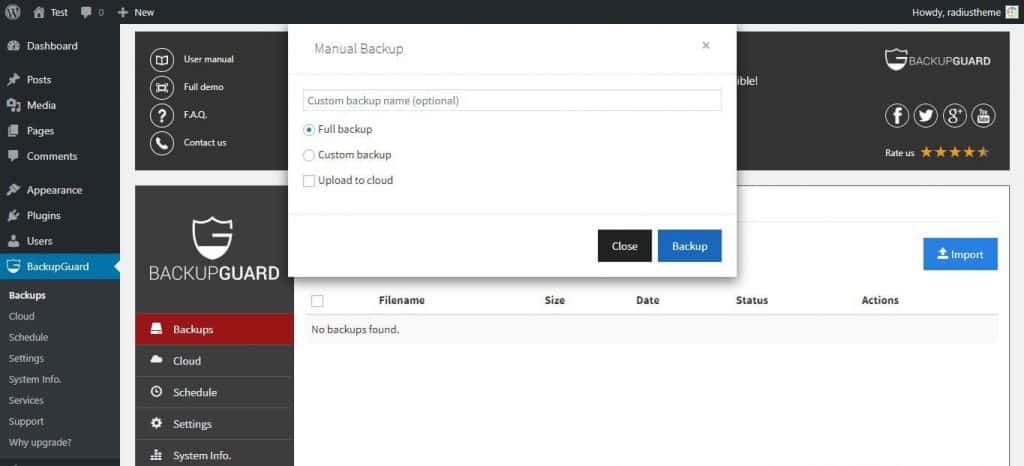
The first step of a backup is going to Backups in the backup guard plugin and clicking the, you guessed it, Backup button. From here you’ll need to name your backup and select either a full or custom type.
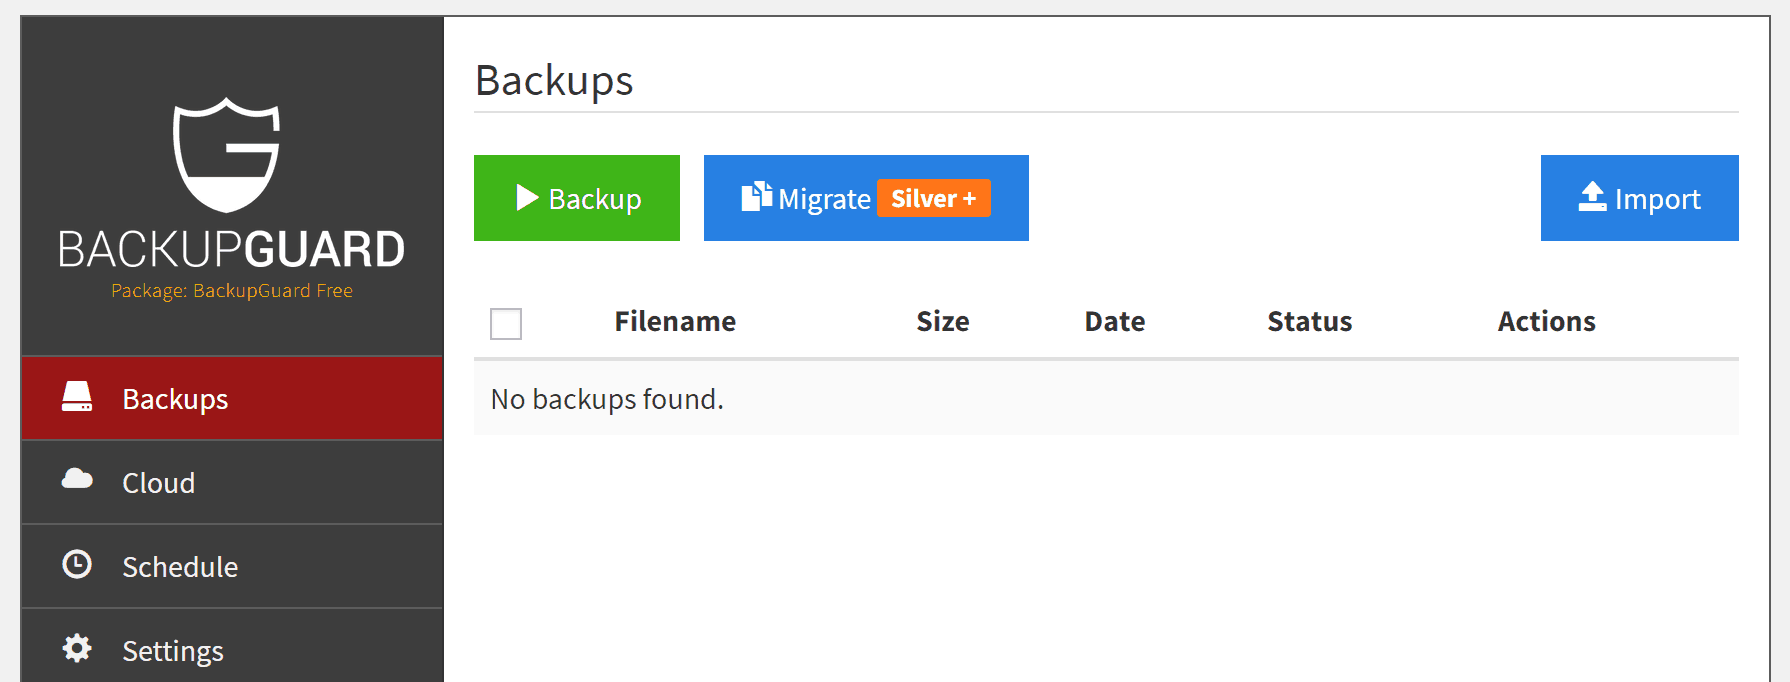
The custom option allows you to select between backing up either your files or database, so select whichever one suits you. Both is our recommendation, but if storage space is an issue it can make sense to try cut down the volume of data.
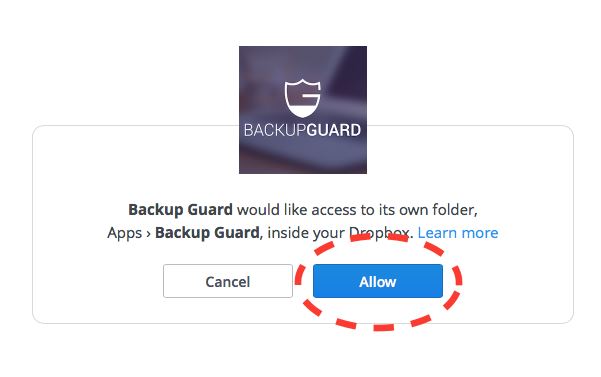
Backups can also be uploaded to the Cloud through a Dropbox link. To set this up, simply go to Backup Guard > Cloud and click the ON button.
This will automatically redirect you to the Dropbox website where you’ll be asked to authorize the plugin. Click Allow, and you’ll be redirected back to WordPress with a confirmation of the connection.
In the example pages, we’ve selected the full backup and called it Test Backup, but our advice would be to use the relevant month and year for your backup titles, allowing you to easily keep track of the data.
When it’s all set up with the options you desire, click the Backup button. When the backup is done, simply download and save it to your preferred location.
3. Backup Guard: Scheduled Backups
Whilst this Backup Guard makes it easy enough to manually backup, using the plugin’s scheduling feature gives all of the security, with far less of the effort.
To schedule these backups, got to Backup Guard > Schedule, then toggle the ON switch and name your schedule. Next, you’ll need to select the frequency of the backups, there are options between hourly, daily, weekly or monthly, so choose whichever you think best suits your websites needs. Its best to try match the frequency of backups to the frequency of content posting, but in this example, ours has been set to weekly.
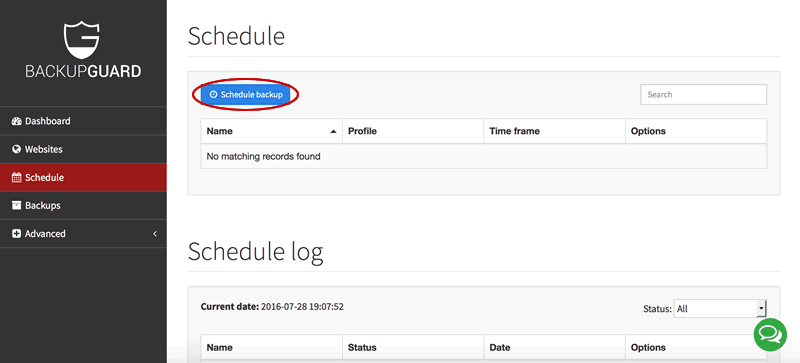
The last step is to select either a full or a custom backup, much the same as in the manual backup section. Once you’ve done this and are happy with the backup schedule, click Save, and you’re done!
4. Backup Guard: Restoration
Theres no need to fret if for whatever reason you do need to restore, the process is simple and straightforward. In the backup guard tab, go to the Backups section. This will present you with a full list of all the saved backups, just select the one you want to restore to and click the green restore icon.
When the process is complete, check everything has fully restored, and you’ll have your website back up and ready.
Backup Guard… Pro
Backup guard also has a premium version: Backup Guard Pro. There are Silver, Gold, and Platinum membership plans. The extras in these plans include:
- ☑️ Backup file selection, with the option of exclusion of certain files
- ☑️ Email tracking on Scheduled backups
- ☑️ Multiple site coverage (up to 10)
- ☑️ Migratable Site/domain service
- ☑️ Multiple
- coverages
- ☑️ Multiple scheduled backups
Paid plans start from as little as $12.50 and include a full year of support and updates. The Platinum plan has recently been halved in price, and it’s definitely worth looking into for anyone who wants the ultimate backup protection for their WordPress website.
UpdraftPlus: The Best on the Market
Backup Guard’s strength lies in its simplicity and straightforwardness, but for someone who needs more room for manoeuvre and the ability to customise, the free plan can feel a bit restrictive. This is where UpdraftPlus, and its greater flexibility, comes in.
UpdraftPlus: An Overview
At over 2 million active installs and with a 5-star rating, Updraft plus is probably the most popular free WordPress backup available, and regularly comes out on top in most comparative reviews. Like backup guard, it offers both backup and restoration, but with a few key features that give it an edge:
- ☑️ Easily automated Backup schedules
- ☑️ Multiple storage options, such as Dropbox,
- etc.
- ☑️ Sites features can be backed up as separate storage entities
- ☑️ A more automated scheduling system, failed backups are rescheduled
- ☑️ Backup selection over specific site elements
- ☑️ Ability to control where separate backup elements are stored
- ☑️ Quick and simple restorations, low server requirements
1. UpdraftPlus: Installation
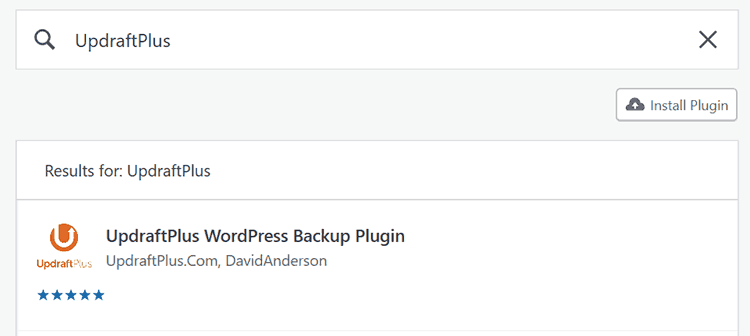
UpdraftPlus can be found in the WordPress dashboard, just go to Plugins > Add new and search for UpdraftPlus, then click Install. When its installed, click the Activate button, the plugin then gives you a short tour of its settings and options.
2. UpdraftPlus: Backing up
In the UpdraftPlus Settings section, you’ll find a menu called UpdraftPlus Backup/Restore. There is a blue backup button, press it to begin your manual backup.
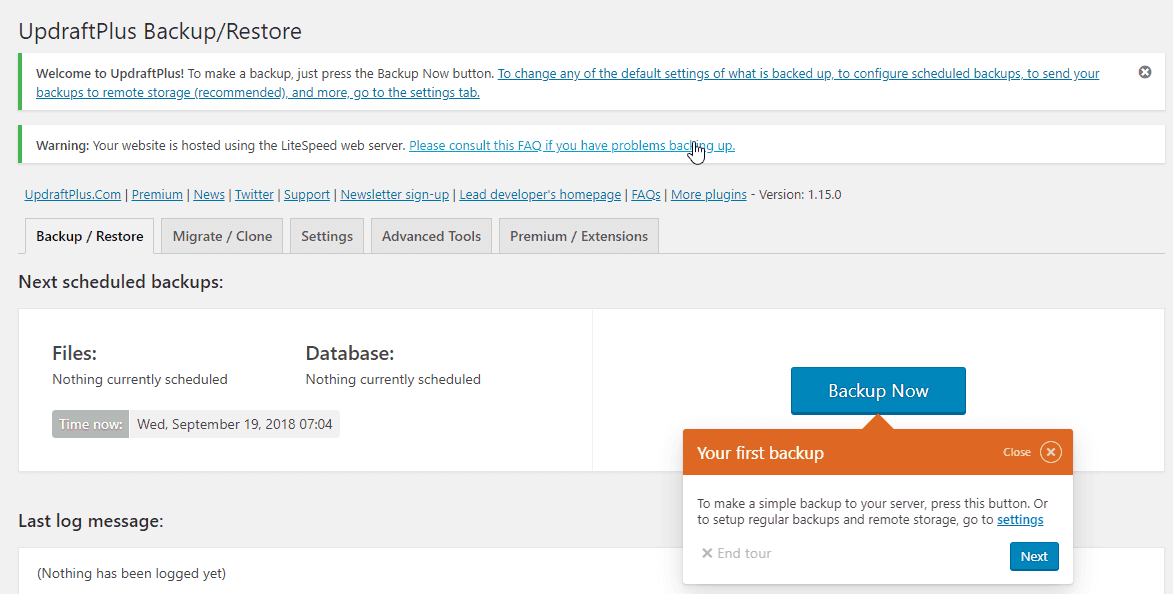
You’ll be given the option to restore your files, database, or both; select an option and then click Backup Now. In this example, we’ve selected both.
This will backup your site on a remote server, it’ll be assigned the date of its creation as a name, so will be easy to find later.
3. Scheduling Backups
Just like Backup Guard, UpdraftPlus lets you run scheduled backups. You can find the option to do so in the Setting tab of UpdraftPlus, but you’ll have the added option of running separate backup schedules for Files and Databases.
This option allows you to tailor the backup service to the needs of your website, and which is best for you depends on factors such as post frequency and rate of updates.
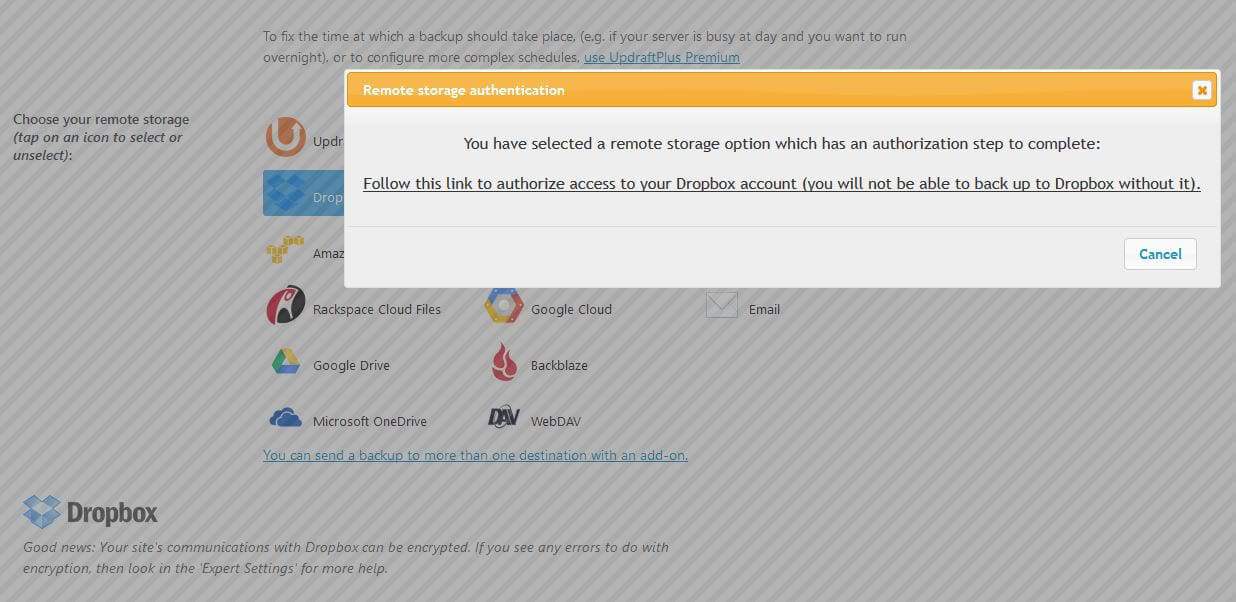
Once the schedule is set, you’ll have to select a storage location. Select the location, files to be included, and then hit Save. Popups will appear and allow you to authorize the connection, and once that’s done, the scheduling will begin taking effect.
4. UpdraftPlus: Restoration.
Restoring with UpdraftPlus offers more options and choice in how to restore. The overall structure however isn’t very complicated, so you won’t need to feel daunted by all the choice available!
To start restoring a backup, go back to the Backup/Restore tab for a list of all your previous backups. From this, then select the backups you’d like to restore.
Click the restore button, and you’ll be given the chance to select what to exactly restore; the flexible system allows you to restore specific aspects of you WordPress site, such as themes, plugins, or files etc.
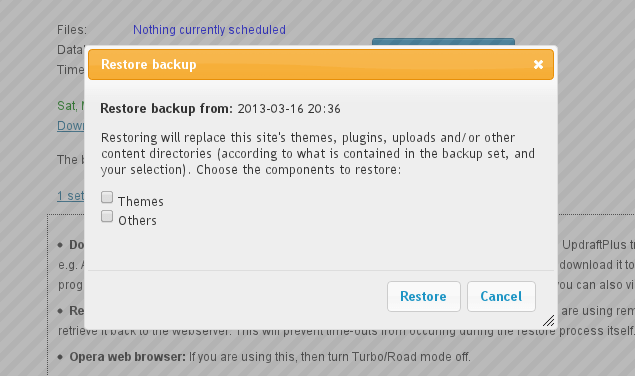
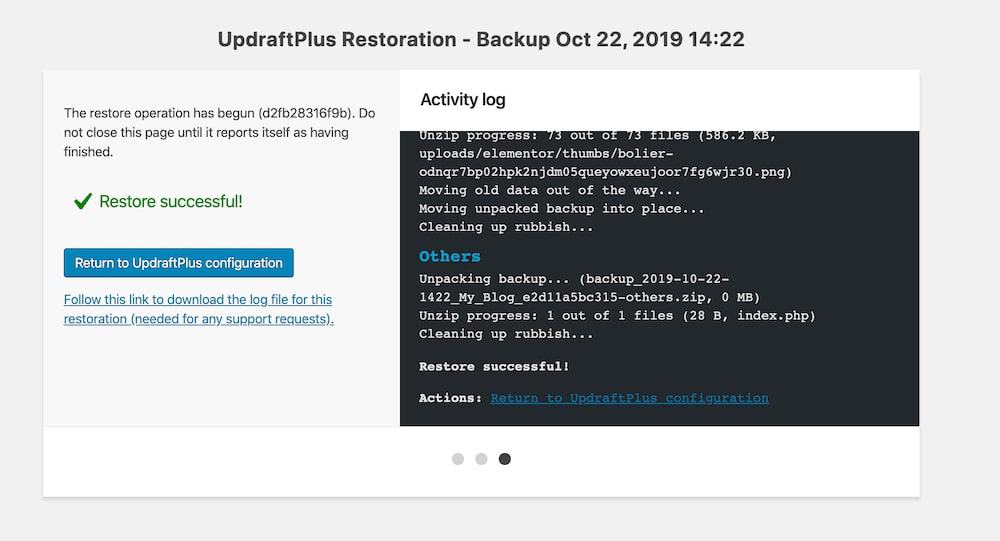
When you’ve selected what to restore, click the restore button and let the process run. With the restoration complete, you’ll also be able to download the log files. It’s wise to do so, and should any issues occur, these files will make it much easier for the UpdraftPlus support team to help.
UpdraftPlus… Premium
UpdraftPlus also offers an even more comprehensive premium version, for a bigger site with a greater volume and variety of content to deal with, this might be more appropriate. The extra features include:
- ☑️ Specified content backups
- ☑️ Simplified Website Migration
- ☑️ Multisite compatibility
- ☑️ Backups include non-WordPress content
- ☑️ Free support from technicians
- ☑️ 1GB of storage on UpdraftVault
- ☑️ A greater variety of storage platform applicability, such as Amazon S3, Rackspace, OneDrive, and many more
- ☑️ Expanded database options
At $70.00, the premium plan is a steeper price than Backup Guard Pro, however, the UpdraftPlus plugin offers far more utility to your website. And for plenty of websites the additional features will certainly be worth the additional cost.
Which Plugin Is Better for Backing up WordPress: Backup Guard or Updraftplus?
Both options provide the peace of mind, security, and utility needed from a backup plugin. While each does its jobs well, there are important distinctions that will influence which is best for you.
For a simple, straightforward product which needs little input to do its job well, Backup Guard is the plugin of choice. It’s ideal for smaller sites with a slower pace of content, the easy setup and uncomplicated processes will serve you well.
On the other hand, if your site is more content heavy, complex, and in need of more specified maintenance, then UpdraftPlus it the ideal choice for you. The plugins ability to offer differentiated backup scheduling for various site features, and for free, make it a vital resource for more active websites.
Manual Backups: Plugins Not Required
For a variety of reasons, you might feel a plugin isn’t for you or your website, or maybe theres a reason a plugin isn’t available to you. If this is the case, then theres still no reason not to backup. If you know how to manually backup, you’ll still be able to secure your site without the need for plugins, so heres how to do it.
When manually backing up, the process is twofold, and you’ll need to backup both Database and Site files. To start, set up a desktop folder to hold the backup, with two subsets for the Database and site files respectively. Again, we’d advise naming the folder the date of the backup to save you time finding it later! Twitter
In this tutorial, the examples are from a cPanel server. However, most server systems have similar formats, and if you use a different server then theres not likely to be much difference. Look for similar wordings and pathways and you should have no trouble finding the data and files you need for a backup.
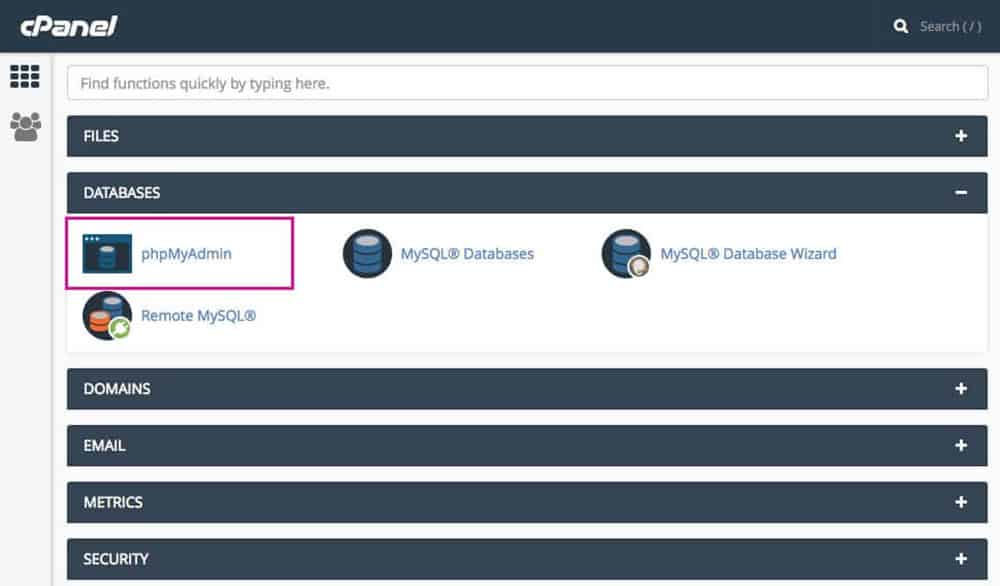
On a cPanel server, you’ll find the Database in phpMyAdmin section, and the files will be in the File manager Console.
Manual backup: Exporting the Database
You’ll first need to login to the admin interface of the cPanel (or other server your using). That said, you’ll most likely be using a cPanel MySQL database system, as this is the standard for WordPress sites.
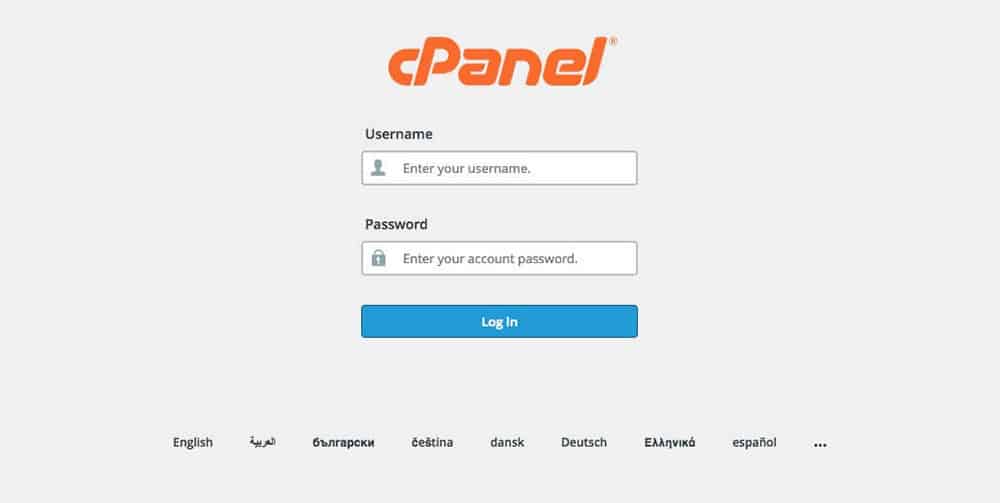
Go into the MySQL system and you’ll find the Website Database, right click and press the phpMyAdmin option (again, this is the WordPress standard). You’ll be redirected to a new phpMyAdmin tab, on the left will be a list of all the websites you have linked to this server.
Select the website you want to backup and youll be presented with a dropdown, table, select ‘export’.
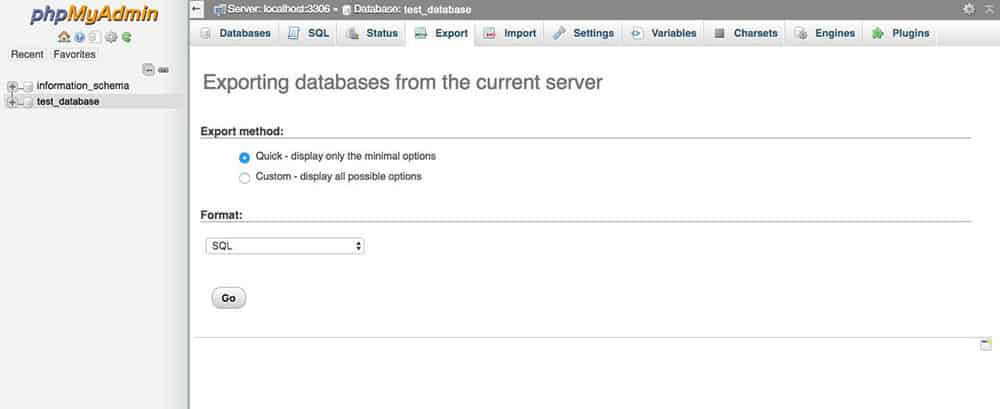
This will take you to the export console with a few options of how to proceed, select export method: quick and format options: SQL. After this just click Go and the download will go ahead, make sure you move it to the Database subfolder in your backup folder so you can keep track of it.
There are some cases where the download won’t be automatic, and it will display all the components in the online console instead. If this happens, just copy it and paste it to an IDE folder and move to your Backup folder.
When you’ve got the database backed up, the next step Is the site files.
Manual backup: Exporting Site Files
There are two main methods for exporting site files, the more commonly used is through the cPanel, but for some websites it might be more appropriate to use FTP.
We will describe both methods and you can decide whats best for you.
Exporting Site Files: cPanel method
To start with the cPanel method, go into the server dashboard and look for the file manager option.
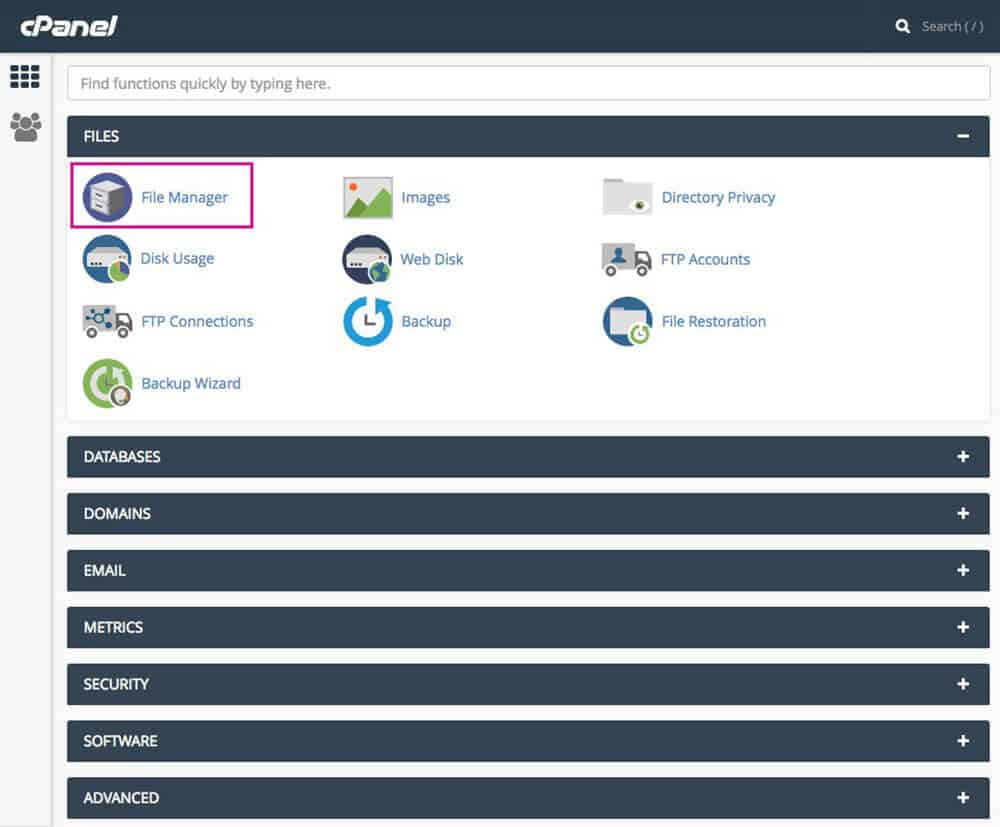
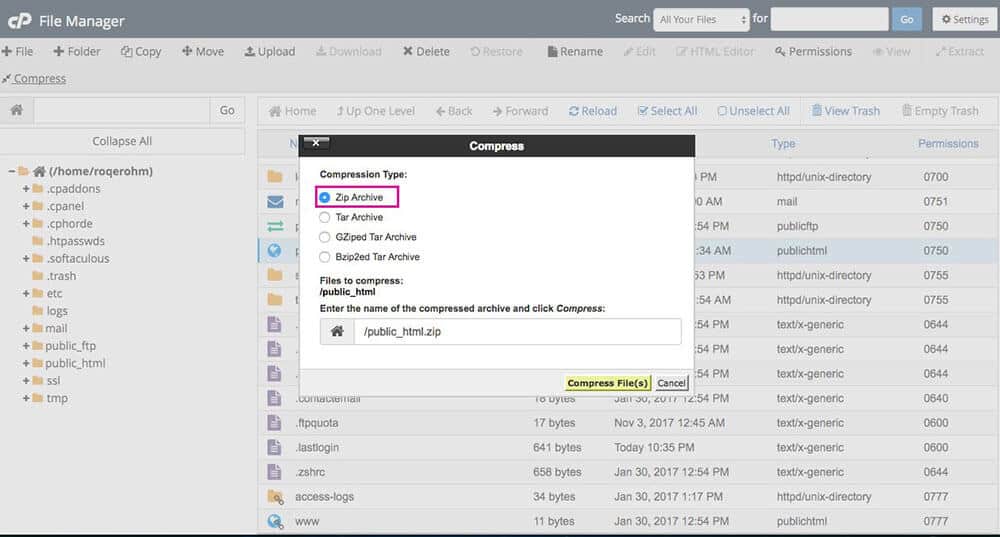
From here, find the public.html folder and click on it, this should give you the option to compress.
A tab will open regarding how you want to compress the file, choose the .zip archive option. After this, confirm the compression by pressing Compress File.
When the process is complete, you’ll see a folder called public_html.zip, download this and move it to the site files folder you made earlier, and your files will be all backed up!
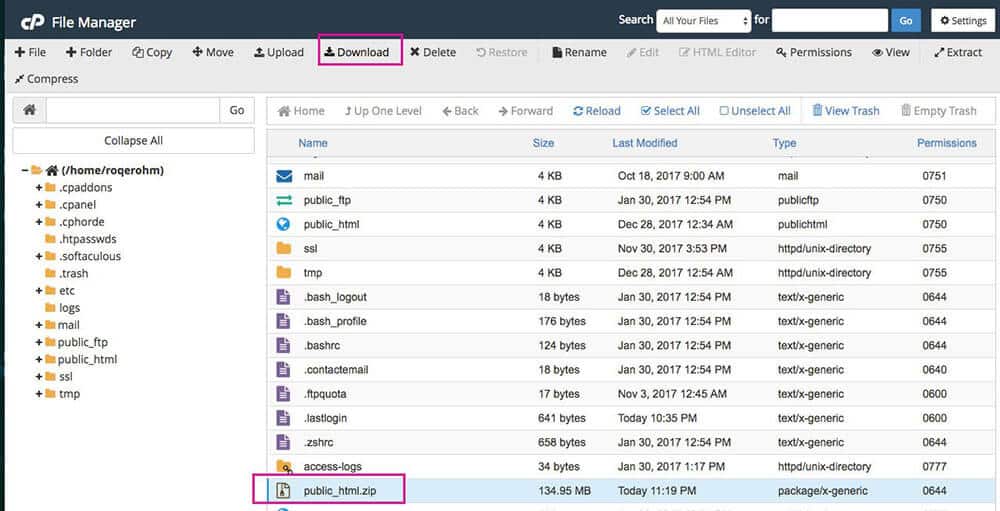
Don’t forget to delete the .zip file left in the server after you’re done, otherwise you’ll be wasting valuable server space!
If for whatever reason this method doesn’t work for you, your next recourse will be FTP.
Exporting Site Files: FTP method
The FTP method, short for File transfer protocol, is a bit more complex, but doesn’t take too much getting used to. You’ll need a client service for this method, a good free choice is either FileZilla or Cyberduck, either can easily be installed directly from their websites.
What these client services allow you to do is interface directly between the live website files and your computer, which is the basis of the FTP method.
For this demonstration we’ve downloaded FileZilla, and your first step will be to get one of the clients.
FTP: Connecting to the Website Server
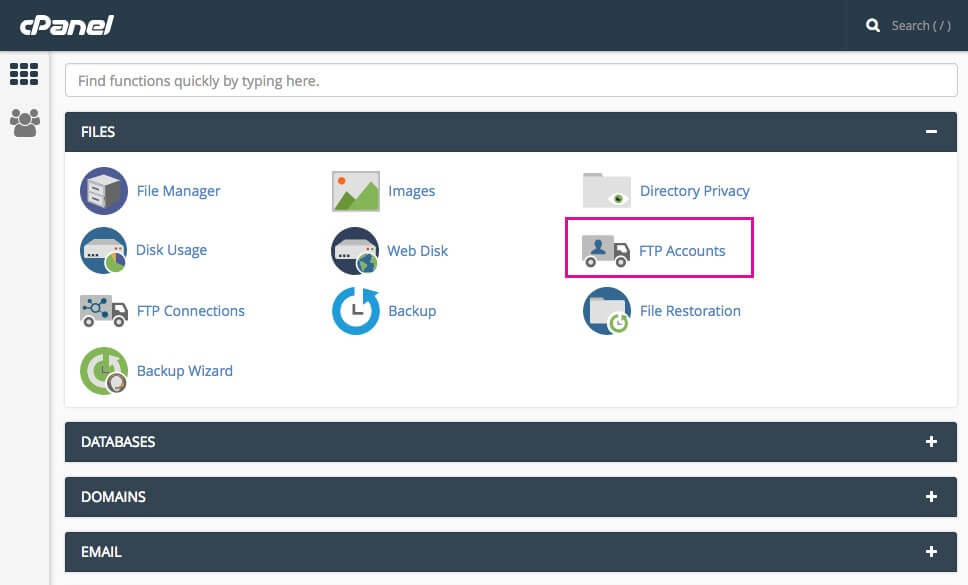
The first step if finding your FTP login details, you’ll need this to open up FileZilla’s connection to the server.
The details can be found in cPanel files, just look for the section FTP accounts, and they should be available, if this isn’t the case, youll need to contact the server host company.
When you have these details, open up FileZilla. You’ll be presented by a two-panel format, the left will represent your computer, and the right the server your connected/connecting to.
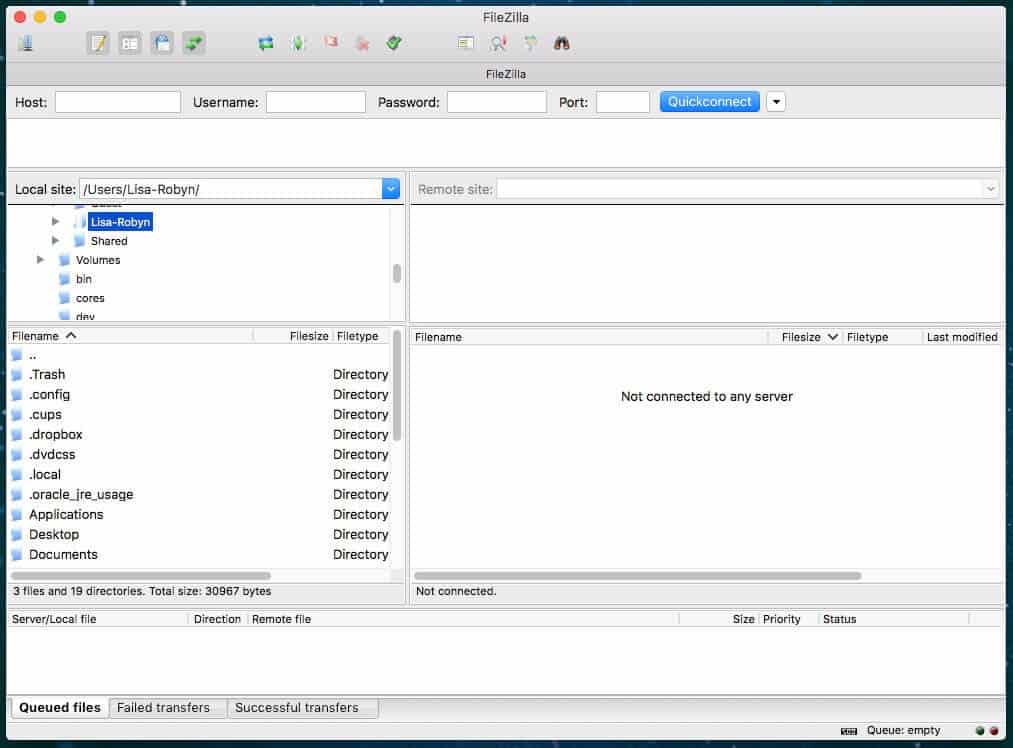
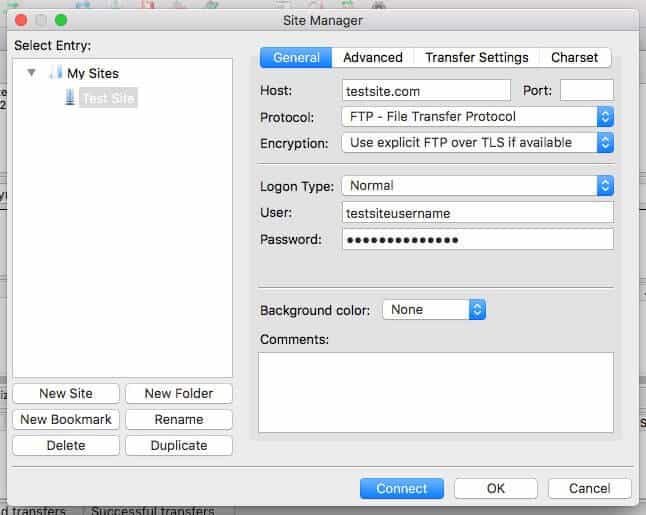
To get the connection working, got to file > site manager. A new tab will pop up, click new site and you’ll be asked to give a name to the site server you’re connecting to.
To connect, first select the normal login type, and then fill in the server details, such as host (domain), Username and password. When you’ve done this and connected, the details will be saved, so you won’t have to worry about putting it in every time you want access to the server through FileZilla.
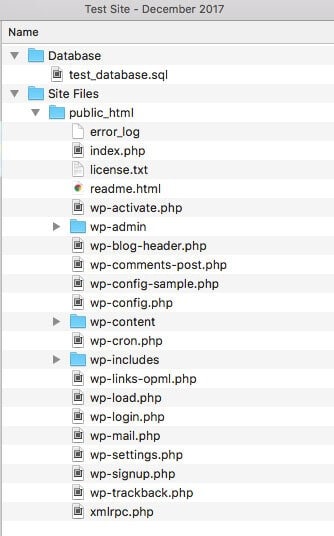
When you’re all connected, look for the Remote site panel, this contains all the websites files and folders. There is a dropdown menu where you’ll find a file called public¬_html, this file is a complete collection of all site files, and what you’ll be exporting as a backup.
FTP: Exporting WordPress files
Using the left-hand interface (the one connected to your local computer files), find the site file backup folder you made earlier.
From here, its as simple as dragging and dropping the public_html folder from the right-hand interface into the site files on the left. This will begin the download process, which varies in time depending on connections speeds.

Manually backing up is certainly a different process from using a plugin, and although it can feel more complicated, it’s a valuable skill to have. If for whatever reason the plugin you are using becomes suddenly unsupported, you can rest easy knowing theres an backup solution to your backups!
Conclusion
Backing up a WordPress website is a small and easy change to make, but in the current online environment it’s become a necessity. According to recent statistics, almost 90% of WordPress websites have noticeable vulnerabilities to hacking; and a backup plugin is one of the only ways to secure yourself against this.
A backup will give you peace of mind, security, and the chance to quickly bounce back should a loss occur. Theres never been more of a reason to backup your site, and never been less of an obstacle to doing so. If you didn’t like these two options, we made a whole guide on the best WordPress backup plugins!
So, don’t wait till you have to say, “I wish I was backed up!”, Download either of the plugins mentioned here (or do it manually!) and backup your WordPress.
Also, if you’re wondering how to switch web hosts for your WordPress site, check out our guide on that.


